Goalist Developers Blog

Get and Send messages to Chatwork with Python

This is Peng.

Today I want to talk about how to get and send messages to Chatwork with python.

It is simple to realize with python library requests and Chatwork API support.

Chatwork API

Chatwork API is an API provided for developers to programmatically interact with Chatwork's services. It enables you to integrate Chatwork’s features into your own web application and business system. Chatwork API can be used to make a web server notify the administrator when an error occurs, or make a project management tool send out messages to other Chatwork users when tasks status are updated.

Before start

Before we start, there are three const that we need to get in hand first.

  1. Chatwork base URL
  2. Account Token
  3. Room ID

The basic Url of chatwork API is BASE_URL = 'https://api.chatwork.com/v2/' .

To access Chatwork, we need our Chatwork Token of account. Each account has its own token to access Chatwork. You can check or apply your token here. f:id:JiahaoPeng:20210218150910p:plain

Of course, we need Room ID in chatwork channel to send or get messages from. https://www.chatwork.com/#!rid206xxxxxx The number 206xxxxxx after the #!rid is our room ID, each room has an unique ID.

With personal token and chatwork API url, the request will be made by the name of our account to get messages or send messages to specific rooms.

So, we have these 3 necessary parts in hand (TOKEN, ROOM_ID, BASE_URL), let's begin!

Send message to Chatwork

What we do is to combine BASE_URL with our requests to send messages to certain rooms.

Let say our message is s = "Hello world", then we just simple execute this code...

import requests

res = requests.post(
            BASE_URL + 'rooms/{}/messages'.format(ROOM_ID)),
            headers={'X-ChatWorkToken': TOKEN},
            params={'body': s}
            )

DONE!

Isn't it very easy?

We don't need to use res variable in later code because it contains the POST response message from Chatwork which are the informations that we don't need. But it is necessary to assign the result of requests.post(....) to a variable.

Get message from Chatwork room

Similar to the sending message code, to get message from certain room, these codes will satisfy:

res = requests.get(
            BASE_URL + 'rooms/{}/messages'.format(ROOM_ID),
            headers={'X-ChatWorkToken': TOKEN}
            )

But when you execute that codes, it will return recent 100 response as a list, of which contains each messages. It seems fine ,but when you run that again, you will get an empty list.

WHY?

Because when Chatwork API receives the GET request from our program, it initially returns the unread messages (maximum 100) to us (which at the first trial all messages are considered unread). Chatwork will then mark those messages as read, so the next time we send request to it , it will return an empty list.

It sounds good for those who only want unread messages in their program, but what if we need those read messages as well?

In the request URL , there is a default suffix attached to the url?force=0, which means do not get those read messages. To get recent 100 messages , what we do is revise the code to :

import requests

force = True // True: Get all recent 100 messages,  False: get only new message
force_flg = '?force=1' if force else '?force=0'
res = requests.get(
            BASE_URL + 'rooms/{}/messages'.format(ROOM_ID)+force_flag,
            headers={'X-ChatWorkToken': TOKEN}
            )

This time we need the content in variable res. Because res is a list consist of 100(maximum) response, each of which will have similar structure like this:

f:id:JiahaoPeng:20210218160919p:plain

If we want to get recent 5 messages no matter read or unread, we can do it this way:

import requests

force = True // True: Get all recent 100 messages,  False: get only new message
force_flg = '?force=1' if force else '?force=0'

res = requests.get(
            BASE_URL + 'rooms/{}/messages'.format(ROOM_ID)+force_flag,
            headers={'X-ChatWorkToken': TOKEN}
            )

recent_n = 5
raw_text = res
        if len(raw_text) != 0:
            recent_n_msg = [i["body"] for i in raw_text[-recent_n:]]
            for i in range(len(recent_n_msg)):
            //  some operations to these messages.

        else:
            print("NO MESSAGES IN THIS ROOM")

Conclusion

In this blog, I introduce how to send and get messages from Chatwork with Python and its requests library. The hidden default parameter of get messages from Chatwork Room is also introduced.

To sum up, this is not difficult to implement, I still hope you learn something from it. :)
Using Selenium to crawl & Compare difference between files

In this blog, I would like to introduce how Selenium library can help us get the content from website and compare files according to different format in the Oz plan content checker project.

The goal of Oz plan content checker project is to detect the content of plan in certain website has changed or not. (compared with the content we collected before).

To do this, we separate it into two steps:

  1. Get data from website
  2. Compare them according to different format (Text, Image, PDF)

Get data from website

The powerful function of selenium allows us to crawl all the website with Javascript rendered and can help us locate the element we want to crawl in website.

There are several things we needs to know before getting element using Selenium:

  1. Web Url
  2. Xpath of that element
  3. Type of data (Image, text, pdf)

After knowing these, we can start crawl data from website!

from selenium import webdriver
import urllib.request
import json

driver = webdriver.Chrome()    # Using Chrome as browser to visit  website
driver.get(url) # open the url
time.sleep(3) # Important ! we need to give the website time to render all the content
element =  driver.find_element_by_xpath({Xpath})

There probably are some dependencies issues if Chrome is not installed in you PC.

If the content is Image format

src = image.get_attribute("src")
r = requests.get(src, stream=True)
with open("/{}.png".format({web-name}), "wb") as file:
   file.write(r.content)

If the content is Text

with open("/{}.json".format({web-name}), 'w+') as f:
   json.dump(text_dict, f, ensure_ascii=False)

If the suffix of website ends with .pdf, then this website is special because it has no xpath. We can use urllib.request to download data to local directory.

response = urllib.request.urlopen(<i>url</i>)
file = open("/{}.pdf".format({web-name}), 'wb')
file.write(response.read())
file.close()

Then no matter which type the website plan is, we can save them all in our local directory! Step 1 complete !

Compare files

Because we need to compare the content of website is changed or not, which means we need to compare the data of today with the data of before.

To compare json file, firstly we load them and just compare them as dict

import json

def json_compare(file_path1, file_path2):
    with open(file_path1) as f1, open(file_path2) as f2:
        data1 = json.load(f1)
        data2 = json.load(f2)
    key1 = data1.keys()
    key2 = data2.keys()
    if key1==key2:
        for key in key1:
            if data2[key] == data1[key]:
                continue
            else:
                return False
    else:
        return False
    return True

To compare image file, the key is to transform the image to the numpy matrix format then we compare the mean square error of each pixels.

import cv2
import numpy as np

def image_compare(file_path1, file_path2):
    img1 = cv2.imread(file_path1)
    
    img2 = cv2.imread(file_path2)
    # we need to resize them to the same size to compare 
    img1.resize((256, 256))
    img2.resize((256, 256))

    # compare image
    diff_img = cv2.subtract(img1, img2)
    if np.sum(diff_img) == 0:
        return True
    else:
        return False

To compare pdf file, there is a powerful library calleddiff_pdf_visually, it convert pdf file to image file in that inner function and compare them.

from diff_pdf_visually import pdfdiff
def pdf_compare(file_path1, file_path2):
    try:
        if pdfdiff(file_path1, file_path2):
            return True
        else:
            return False
    except:
        return False

Summary

In this blog, method to get element from website and 3 functions to compare file with different format are introduced. That's all I want to share, hoping this will help your coding in the future.

GitHub Actionsでのビルド/デプロイの自動化

どうも,エンジニアのナカノです.

今回は,GitHub Actionsによるフロントやバックのビルド/デプロイの自動化をお話致します.

実はGitHub Actionsの経験が無く,それで今回の自動化で使ってみることにしました.

目 次
  • 背景
  • 作り方
  • 所感


背景

今回は,未経験の技術を実際に試してみて,それで自動化が実現出来たらなという感じです.

CI/CDといえば,今まではGitLab CI/CDJenkinsCircleCIを使って構築していました.

今回の外部案件ではCircleCIを使おうかな(個人的にはCircleCIは好きなので...)と考えてました.

ただ,社内でGitHub Actionsが使われ始めており,それで気になって今回試してみました.


作り方

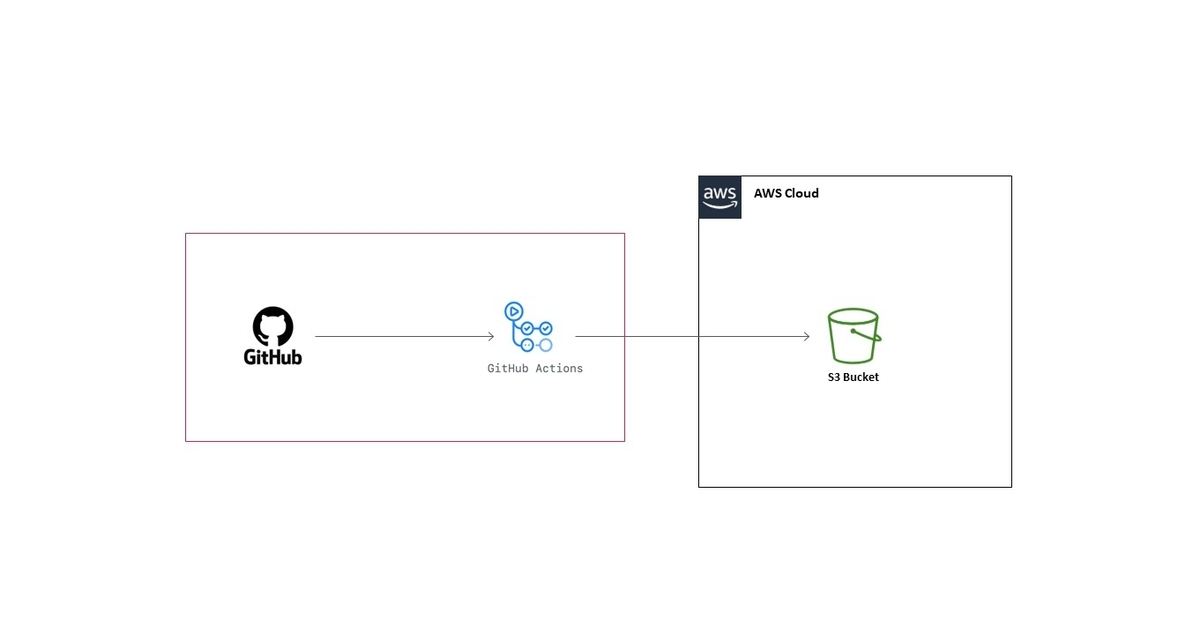
ここでは,フロントソースのビルド生成物をS3へアップロードする場合を考えます.

構成図は以下の通りです.至ってシンプルな図です.問題は中身の設定です.

f:id:r-nakano:20200930195423j:plain

公式資料や社内ソースを参考にし,ワークフローの設定をそれっぽく作りました.

以下は,フロントエンド用のGitHub Actionsのワークフローの設定です.

バックエンド向けのワークフローの設定についても,同様な設定で作りました.

docs.github.com


.github/workflows/sample.yaml

name: xxxxxxxx

on:
  push:
    branches:
      - master

jobs:
  build_and_deploy:
    runs-on: ubuntu-latest
    steps:
      - name: checkout
        uses: actions/checkout@v2

      - name: set up node
        uses: actions/setup-node@v1
        with:
          node-version: xx.xx.xx

      - name: cache
        uses: actions/cache@v2
        with:
          path: ~/node_modules
          key: xxxxxxxx-${{ hashFiles('**/package.json') }}-${{ hashFiles('**/package-lock.json') }}
          restore-keys: xxxxxxxx-

      - name: build
        run: xxxxxxxx

      - name: configure aws credentials
        uses: aws-actions/configure-aws-credentials@v1
        with:
          aws-access-key-id: ${{ secrets.AWS_ACCESS_KEY_ID }}
          aws-secret-access-key: ${{ secrets.AWS_SECRET_ACCESS_KEY }}
          aws-region: ${{ secrets.AWS_DEFAULT_REGION }}

      - name: deploy
        run: xxxxxxxx


この設定をベースで作り上げると,次の一連の処理を行うことが出来ます.

  1. Nodeに関するセットアップを行う

  2. もしあれば,node_modulesのリストアを行う

  3. フロントソースのビルドを実施する

  4. AWSクレデンシャルのセットアップを行う

  5. ビルド生成物のS3へのアップロードを行う

  6. node_modulesをキャッシュとして保存する


所感

CI/CDサービスとしては,使い易い印象を持ちました.小さいところから始めるには適してます.

実際,ワークフローの設定さえ作れば,Gitプロジェクトとの連携のセットアップ等は不要です.

ワークフローの中でActionsというものが使えます.CircleCIで言うとOrbsみたいなものですかね.

ただ,細かくカスタマイズしたり,D in Dの構成でやりたいならCircleCIの方が使い易そうです.

GitHub Actionsから始めて色々なCI/CDサービスを勉強するのは,かなりアリだと思います.

Reactアプリのローカル環境の構築の自動化

どうも,エンジニアのナカノです.

今回は,Reactアプリのローカル環境の構築を自動化するという内容をご紹介致します.

環境構築を自動で行うために、Reactアプリをコンテナ化したいと思います.

目 次
  • 背景
  • 作り方
  • 所感


背景

外部案件に携わることが多いのですが、毎回辛いのが環境構築の作業と手順をまとめることです.

環境構築を行い,手順通りにやっているのに構築が何故か上手く出来ない.あると思います.


f:id:r-nakano:20200930190545p:plain


また,手順を作るのも面倒ですよね.そこで,環境を一式用意出来たらいいのになあという願望が.

それでどうせならと,勉強がてらにReactアプリをコンテナ化して作る人の負担を減らそうかなと.


作り方

雛型を作るところまでは簡単だったのですが,動作確認と修正で割とハマってしまいました.

色々と試行錯誤して,以下の設定で落ち着きました.一旦,これでローカル環境が用意出来ます.


Dockerfile

FROM node:xx.xx.xx

WORKDIR /srv/
COPY ./*.json /srv/

RUN npm install && \
    chown -R node:staff ./*

RUN apt-get -q -y update && \
    apt-get install -q -y locales locales-all && \
    locale-gen ja_JP.UTF-8

ENV LANG=ja_JP.UTF-8 \
    LANGUAGE=ja_JP:ja \
    LC_ALL=ja_JP.UTF-8

EXPOSE 3000


docker-compose.yaml

version: '3'
services:
  react_app:
    build: .
    container_name: react-app
    volumes:
      - "./src:/srv/src"
      - "./bin:/srv/bin"
      - "./public:/srv/public"
      - "./.env.development:/srv/.env.development"
    ports:
      - "3000:3000"
    working_dir: /srv
    tty: true


上記の様な内容でDockerfile,docker-compose.yamlを用意した後で,以下を実行します.


$ docker-compose up -d
$ docker-compose exec react_app bash


そしてコンテナに入り,Reactアプリの起動コマンドや起動シェル等を実行します.

動作確認でハマってしまって,一旦この様にしてます.もっと上手く出来るかも...

あとは,http://localhost:3000をブラウザで叩けば,Reactアプリの画面が表示されます.

ポートフォワーディングが必要な場合は,その対応も行って頂くと良いかもです.


f:id:r-nakano:20200930190850p:plain


所感

アプリのコンテナ化は細かい部分でハマりましたが,良いトレーニングになりました.

ちなみに,同様な方法により,Angularアプリのコンテナ化も行うことが出来ます.

その場合は,Angular CLIのインストール処理をDockerfileへ追記すれば良いです.

今後も,自動化出来る部分はその様にして,開発すべき部分へ注力出来ればと思います.

Finding File Paths in Your AWS S3 Database

Hello this is Kim from Goalist.

Today I would like to explain an automation I made using AWS(Amazon Web Service) S3 and python. It is easy to access your files when you don't have too much data in your S3 database.

However, if you have a big data or if you need to find a specific data you can't spend your time looking through all your folders to find files you need.

So this automation helps you look up all the paths for the files you need.

Getting started

In order to gain access to your AWS S3 database, first you need to set your credentials so that you can access your AWS S3 database with python.

In your terminal you can simple install the AWS CLI(Command Line Interface) by simply typing:

aws configure

with this, it will ask you to input AWS Access Key Id, AWS Secret Access Key, Default region name, Default output format like the following

AWS Access Key ID [None]: 
AWS Secret Access Key [None]: 
Default region name [None]: 
Default output format [None]: 

However, you can change this in the credentials file in your .aws folder.

Once you have setup your AWS CLI, you can now proceed gaining access to your AWS Bucket with boto3 like the following.

AWS_BUCKET_NAME = 'your bucket name'
session = boto3.session.Session(profile_name='your profile name')
s3 = session.client('s3')

Searching for files

After you gain access to your AWS with boto3, it is time to list all the objects in your bucket.

def list_objects(key_prefix):
    res = s3.list_objects_v2(Bucket='oz-data', Prefix=key_prefix)
    if 'Contents' in res:
        return list(map(lambda x: x['Key'], res['Contents']))

like the above I used the list_objects_v2 method to get my list of all the objects in my bucket.

Next, to find the file path you need, you can write a code that performs as a filter. In my case, I needed my files to include a certain string or have certain dates in between.

Finally, after getting all the files I need, I add them up to a csv file so I can check the path and download the files I need.

Wrap up

That's all from my automation and for this post. I'll leave a link for boto3 documentation and AWS CLI so you can check all the cool commands that you can use.

I'm Kim from Goalist and I will see you soon in another post. Happy Coding :)

Links Boto3 Documentation: https://boto3.amazonaws.com/v1/documentation/api/latest/reference/services/s3.html

AWS CLI Documentation: https://docs.aws.amazon.com/cli/latest/userguide/cli-configure-quickstart.html

serverlessとstep functionを利用した情報補完処理を作りました

お久しぶりです、ゴーリストのチナパです!

この度、ゴーリストで「自動化100」というテーマでエンジニア達がみんな合わせて様々プロセスを自動化しようとしています。(年内で100個のチャレンジです!)

大きな図から始めさせてください。 今年、ゴーリストのHR事業部で「プロダクトバリュー最大化」を目指し、提供しているデータをより価値高くしようとしています。長い話を簡潔にいうと、会社名からその会社のお電話番号を調べるため、様々なクローラーを利用して、プロセスを作成しました。ただし、これは現在一個ずつコマンドを叩いて実行しなきゃいけないので、最適ではありません。その現状から、AWSのstep functionを利用して、設定ファイルにしたがって、最初から最後まで勝手に動くようにしました。

f:id:c-pattamada:20200811114644p:plain
step functions!

細かい課題設定でいうと、いくつかのFargate/lambdaコンテナーを設定通り動くようにしたいです。(そもそもFargateでどうやってクローラー実行できるのとか気になる方はこちらを参考にしてください)。

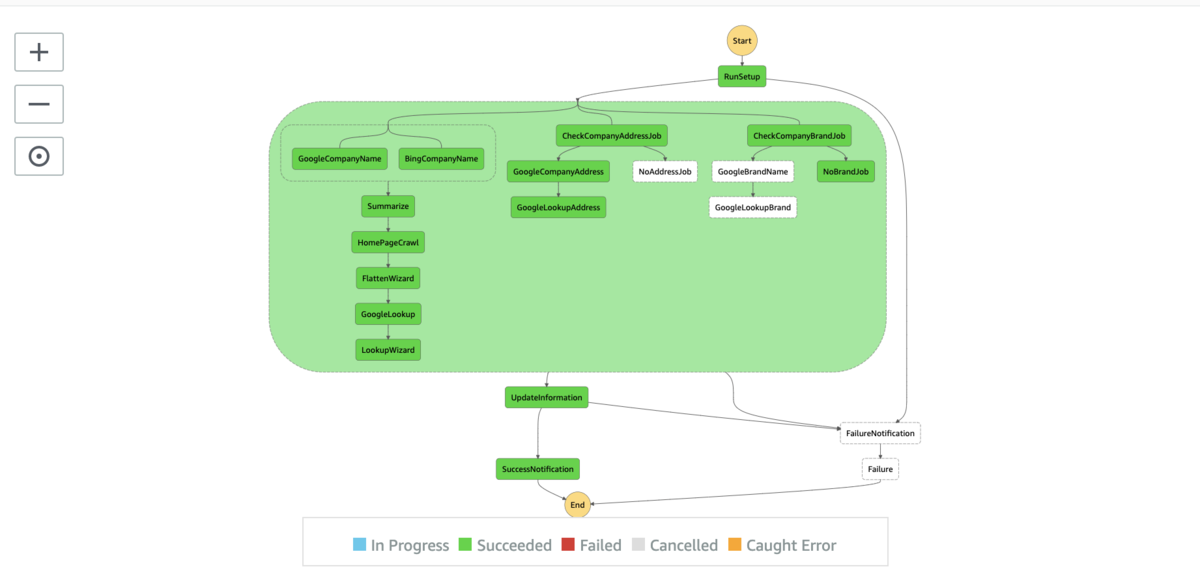
最終形態はこちらです。

成功する時:

f:id:c-pattamada:20200811111317p:plain

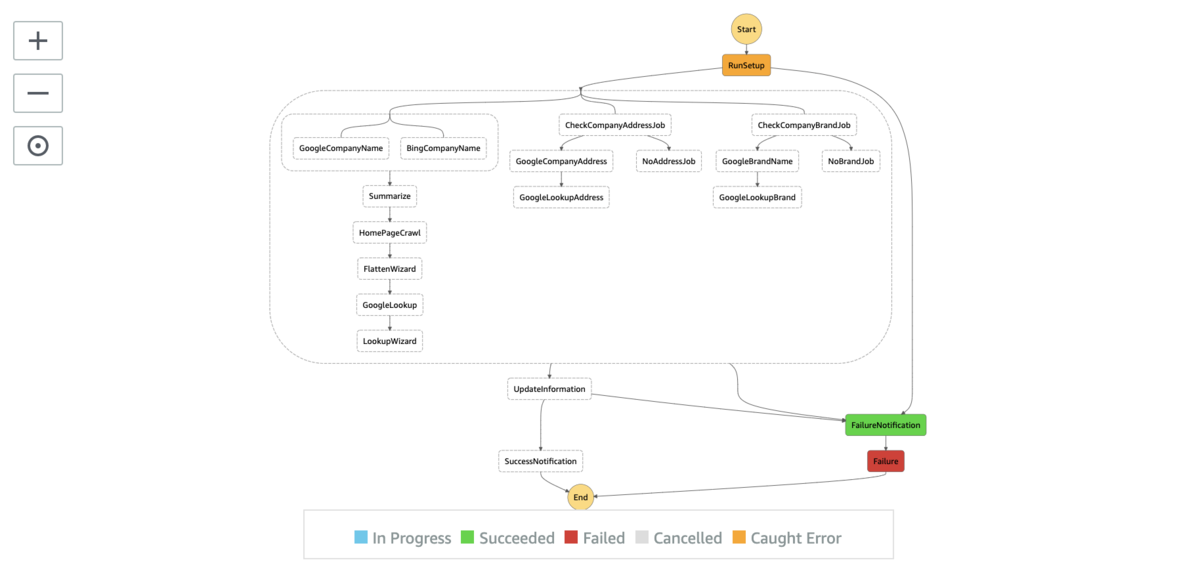
そしてうまく行かない時も、静かに死ぬではなく、通知がきます。

f:id:c-pattamada:20200811111415p:plain

どうやってstep functionを利用できた?

一つのブログでとても抑えきれなさそうですので、いくつかの便利なところを紹介します。 step function を設定するためのserverless.yml の一部をサンプルとして用意しました。4つのとても便利なところをハイライトしました。

stepFunctions:
  stateMachines:
    addTelephoneFromCompanyName:
      definition:
        Comment: "Will do cool things."
        StartAt: MyTask
        States:
          SuccessNotification:
            Type: Task
            Resource: "arn:aws:lambda:#{AWS::Region}:#{AWS::AccountId}:function:${self:service}-${opt:stage}-successNotification"
            Parameters:
              "Payload.$": "$"
            End: True
          MyTask:
            Type: Task
            Resource: "arn:aws:states:::ecs:runTask.waitForTaskToken" # ➀
            Next: SuccessNotification
            ResultPath: "$.my_output"  # ②
            Catch:                                  #③
              - ErrorEquals:
                  - States.ALL
                Next: FailureNotification  # 失敗した際のstepを適当に懐ける
                ResultPath: $.Error
            HeartbeatSeconds: 300
            Parameters:
              LaunchType: FARGATE
              Cluster: !GetAtt FargateECSCluster.Arn
              TaskDefinition: !Ref FargateECSTaskDefinition
              NetworkConfiguration:
                AwsvpcConfiguration:
                  AssignPublicIp: ENABLED
                  SecurityGroups:
                    - !Ref FargateSG
                  Subnets:
                    - !Ref FargateSubnet
              Overrides:
                ContainerOverrides:
                  - Name: "hp_crawler_container"
                    Command:
                      - "python"
                      - "run.py"
                    Environment:  # ④
                      - Name: "TASK_TOKEN_ENV_VARIABLE"
                        "Value.$": "$$.Task.Token"
                      - Name: "FEED_BUCKET_NAME"
                        Value: "company-hp-crawler-serverless"
                      - Name: "SETTINGS_FILE"
                        "Value.$": "$.settings_file"
                      - Name: "INPUT_FILE"
                        "Value.$": "$.input_file"

上記のようなサンプルで➀から④のところが肝だなと思いました。

➀ waitForToken設定

ecsをが実行し、そのあとで、次のステップを行うため、waitForTaskTokenのやり方でやっていました。ecs側でsend_task_successを呼ぶ必要があります

② ResultPath

ResultPath: "$.my_output"  # ②

step functions のResultPathを利用したら、stateのアウトプットがそのパスのしたで出力されます。そして、stateのインプットを次のstateのも使う必要があれば、できます。 上記のinputが

{"my_input": "hi"}

であれば、アウトプットがこうなります:

{"my_input": "hi", "my_output": "..."}

ResultPathを利用しないと、インプットが上書きされます。

③ Catch:

何かの状況でstateが失敗した時、別処理を行うために使います。 私のお経験で3つの利用で失敗することがあります ・まずは、Taskをかいしする前の問題: 例ecsの定義に問題がある場合(存在しないなど) こちらはAmazon側でかってに認識してエラーが出るので、CatchがあればOKです。 ・ecsの中の処理が失敗する、や自分のコードにエラーが出る。 こちらはコードの中でtry・catch処理を行い、エラーが出る場合、send_task_failure を使ってます。 ・クローラーの場合、エラーが出ずにIOに立ち止まったり、他のトラブルもたまにありますので、定期的にsend_task_heartbeat をよび、state definitionで"HeartbeatSeconds: 300"でも設定すると、タイムアウトエラー的に機能します。

上記のどれかのやり方でエラーが出る場合、Catch処理を実行し、失敗の通知を送るように設定できてます。

④ ecsの環境変数

ecsにstateから変数を渡す時はecsの環境変数を使うとうまく行きました。InputPathを利用し、設定できます。つまり、 inputが

{"my_input": "hi"}

"$.my_input" を設定したら、環境変数に"hi"という文字列を設定できます。

まとめ

ほぼまる1ヶ月かかった自動化でしたので、具体的な説明はブログでまとめづらかったですが、上記の4つのtipsを使うと、 ecs + step functionでの開発をしようとしている方が少しでも楽になるかなと思ってます!

これからも自動化の話題いっぱい投稿するつもりなので、よろしくお願いします!

Serverless Framework,CircleCIでの更新の自動化

どうも,エンジニアのナカノです.

今回は,Serverless Framework,CircleCIでの更新の自動化の内容をご紹介致します.

このお話は,前回の以下の記事の続編となります.主に,CI/CDの話です.

developers.goalist.co.jp

目 次
  • 背景
  • 作り方
  • 所感


背景

テスト,ビルド,デプロイの手順は,EC2の自動管理の開発の際に作っていました.

ただ,手動実行するのが面倒なのと,更新履歴を管理したいというのがありました.

また,CI/CDを作ってしまえば,ローカルでの準備が最低限度の形で済みます.

以上より,インフラと関数パッケージの更新の自動化を行うことに決めました.


作り方

インフラの作成/更新はServerless Frameworkで行い,CI/CDツールはCircleCIにしました.

f:id:r-nakano:20200831193353j:plain


Gitプロジェクトの構成は次の通りです.CI/CDの処理はSHファイルにまとめる様にしています.

ec2-serverless-manager
├── .circleci
│   └── config.yml       # CircleCIの設定ファイル
├── .gitignore
├── README.md
├── ci-package
│   ├── Dockerfile       # ビルドしたイメージはECRで管理している
│   └── bin
│       ├── deploy.sh    # パッケージのビルド、インフラやパッケージのデプロイ
│       └── validate.sh  # モジュールのインストール、Goソースのエラーチェック
├── go.mod
├── main.go
├── pkg
│   ├── aws-ec2.go
│   ├── aws-ssm.go
│   └── chatwork.go
└── serverless.yml       # Serverless Frameworkの設定ファイル


Dockerfileは,golangのイメージをベースとして,以下の様に作成しました.

FROM golang:1.15.0

ENV NODE_VERSION=12 \
    SLS_VERSION=1.79.0

RUN apt-get -q -y update && \
    curl -SL https://deb.nodesource.com/setup_${NODE_VERSION}.x | bash && \
    apt-get -q -y install -y nodejs && \
    npm install -g serverless@${SLS_VERSION}


CircleCIで実行するシェルスクリプトは,それぞれ次の様に実装しました.

# ci-package/bin/validate.sh
#!/bin/bash


# Params
set -eux
script_dir=`(cd $(dirname $0); pwd)`


# Execution
cd ${script_dir}/../../
go install
go test -race -v ./...
# ci-package/bin/deploy.sh
#!/bin/bash


# Params
set -eux
script_dir=`(cd $(dirname $0); pwd)`


# Execution
cd ${script_dir}/../../
GOOS=linux go build main.go
sls deploy -v


また,Serverless Frameworkの設定ファイルserverless.ymlの中身は,次の様な感じです.

service: ec2-serverless-manager

frameworkVersion: '>=1.28.0 <2.0.0'

configValidationMode: warn

provider:
  name: aws
  runtime: go1.x
  stage: ${opt:stage, 'dev'}
  region: ${env:AWS_DEFAULT_REGION}
  stackName: ec2-serverless-manager-cf-stack
  apiName: ec2-serverless-manager-rest-api
  deploymentPrefix: artifacts
  deploymentBucket:
    name: xxxxxxxx.xxxxxxxx.xxxxxxxx
    maxPreviousDeploymentArtifacts: 3
  iamManagedPolicies:
    - 'arn:aws:iam::aws:policy/AmazonEC2FullAccess'
    - 'arn:aws:iam::aws:policy/AmazonS3FullAccess'
    - 'arn:aws:iam::aws:policy/CloudWatchLogsFullAccess'
  iamRoleStatements:
    - Effect: Allow
      Action:
        - 'ssm:Get*'
        - 'kms:Encrypt'
        - 'kms:Decrypt'
        - 'kms:ReEncrypt*'
        - 'kms:GenerateDataKey*'
        - 'kms:DescribeKey'
      Resource: '*'
  logs:
    restApi:
      accessLogging: true
      format: 'requestId: $context.requestId'
      executionLogging: true
      level: INFO
      fullExecutionData: true
      roleManagedExternally: true

functions:
  ec2Manager:
    handler: main
    name: ec2-serverless-manager-lambda-function
    description: Lambda function of EC2 serverless management system
    memorySize: 128
    runtime: go1.x
    timeout: 300
    environment:
      CW_ROOM_ID: xxxxxxxx
    tags:
      Name: ec2-serverless-manager-lambda-function
    events:
      - http:
          path: /
          method: POST


更に,**CircleCIの設定ファイル.circleci/config.ymlの作成は,次の記事を参考に作りました.

medium.com

GitHubとの連携は,次の様なブランチとタグの使い分けの方法で実施する様に対応しました.

  • masterブランチが更新された時は,Goソースのエラーチェックのみを実施する

  • タグが作成された時は,パッケージのビルド,インフラやパッケージのデプロイを行う


所感

Serverless Frameworkは初めて利用しました.やはり,サーバレスインフラの構築に合ってます.

インフラの規模としては,恐らく大きく無いものを作るのに適していそうな気がしますね.

小さく無いインフラを細かく設計して作る等だと,Terraformの方が使い勝手が良さそうです.

何はともあれ,以前から気になってたIaCツールを,今回の自動化の対応で試せて良かったです.