Goalist Developers Blog

Business Card Reader : Part 2 : Frontend (Ionic App)

Hello World! My name is Vivek Amilkanthawar
In the last blog post, we had written cloud function for our Business Card Reader app to do the heavy lifting of text recognition and storing the result into database by using Firebase, Google Cloud Vision API and Google Natural Language API.

We had broken down the entire process into the following steps.
1) User uploads an image to Firebase storage via @angular/fire in Ionic.
2) The upload triggers a storage cloud function.
3) The cloud function sends the image to the Cloud Vision API
4) Result of image analysis is then sent to Cloud Language API and the final results are saved in Firestore.
5) The final result is then updated in realtime in the Ionic UI.

Out of these, step #2, step #3 and step #4 are explained in last blog post
If you have missed the last post, you can find it here...

developers.goalist.co.jp

In this blog post, we'll be working on the frontend to create an Ionic app for iOS and Android (step #1 and step #5)

The final app will look something like on iOS platform
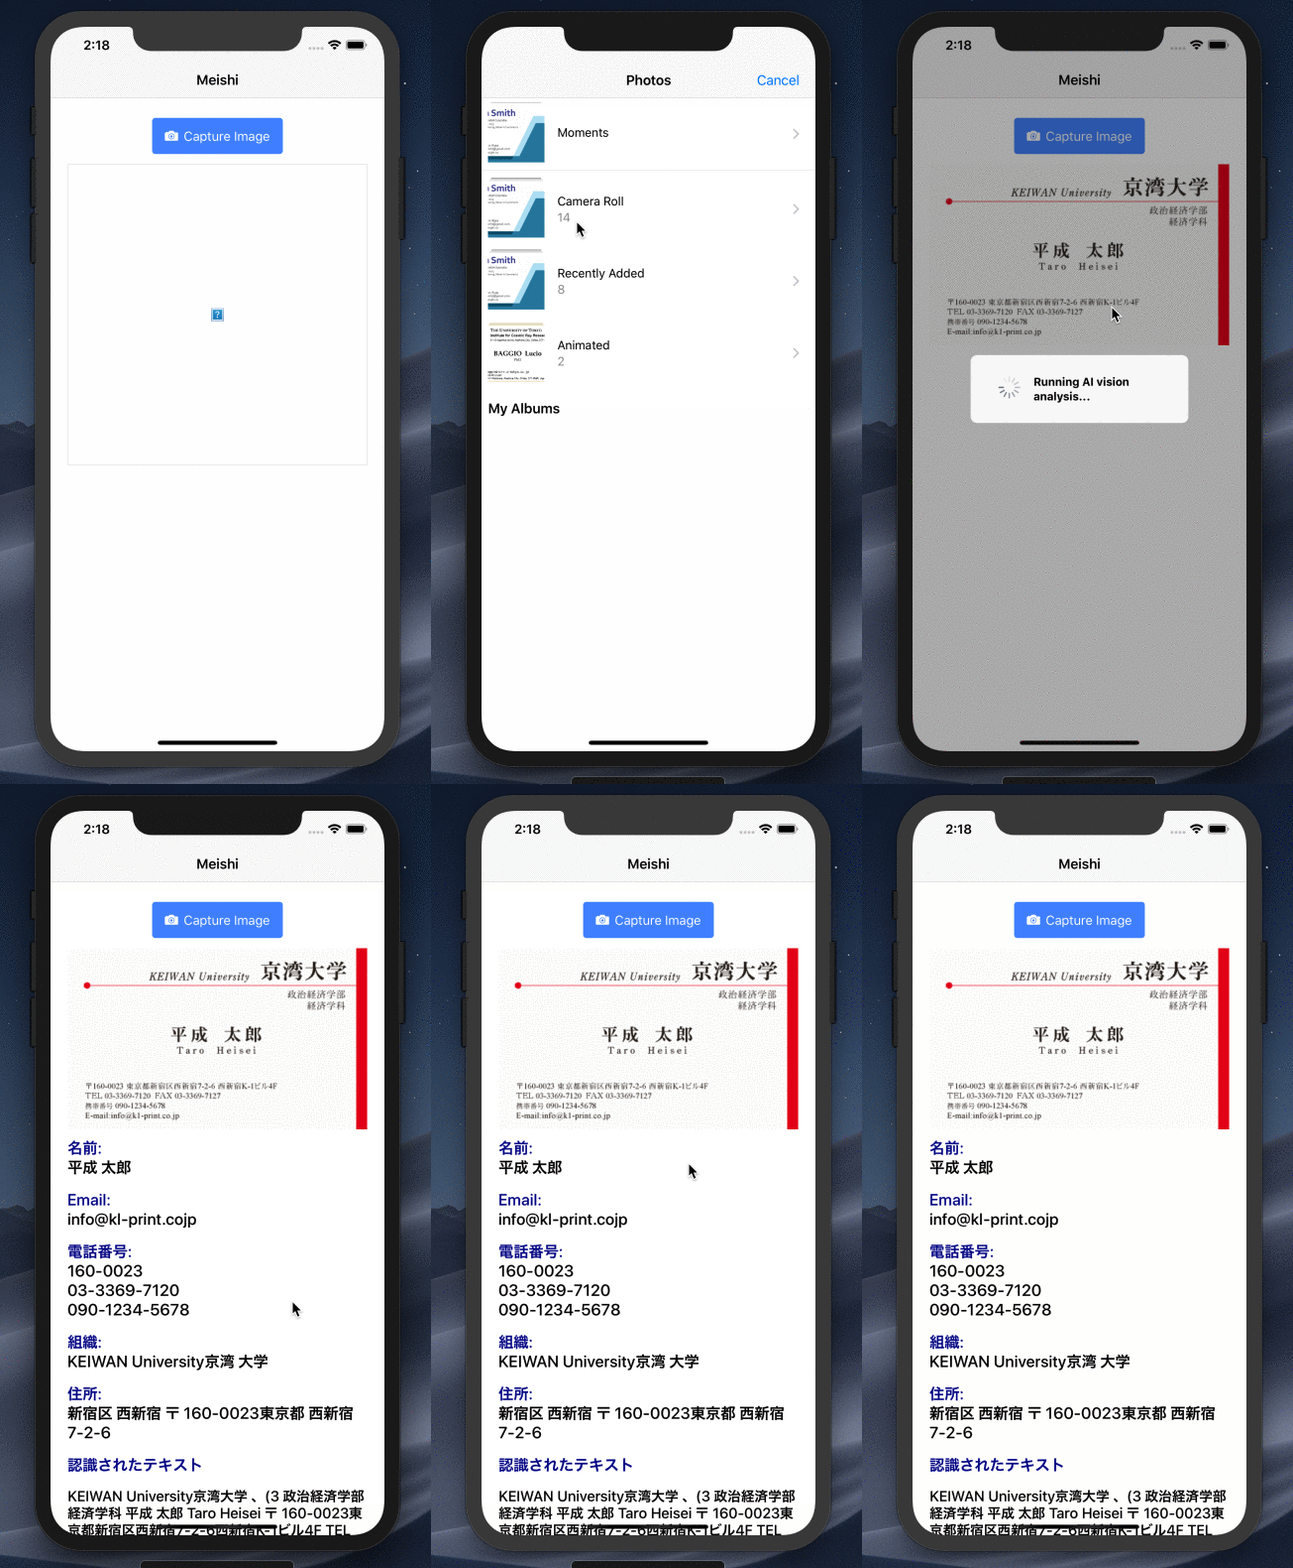
f:id:vivek081166:20190121142143g:plain

So let's get started

Step 1: Create and initialize an Ionic project

Let’s generate a new Ionic app using the blank template. I have named my app as meishi (めいし) it means 'business card' in Japanese.

ionic start meishi blank
cd meishi

Making sure you are in the Ionic root director then generate a new page with the following command

ionic g page vision

We'll use the VisionPage as our Ionic root page inside the app.component.ts

import { VisionPage } from '../pages/vision/vision';
@Component({
  templateUrl: 'app.html'
})
export class MyApp {
  rootPage:any = VisionPage;
  // ...skipped
}

Add @angular/fire and firebase dependencies to our Ionic project for communicating with firebase.

npm install @angular/fire firebase --save

Add @ionic-native/camera to use native camera to capture buisness card image for processing.

ionic cordova plugin add cordova-plugin-camera
npm install --save @ionic-native/camera

At this point, let's register AngularFire and the native camera plugin in the app.module.ts
(add your own Firebase project credentials in firebaseConfig)

import {BrowserModule} from '@angular/platform-browser';
import {ErrorHandler, NgModule} from '@angular/core';
import {IonicApp, IonicErrorHandler, IonicModule} from 'ionic-angular';
import {SplashScreen} from '@ionic-native/splash-screen';
import {StatusBar} from '@ionic-native/status-bar';

import {MyApp} from './app.component';
import {HomePage} from '../pages/home/home';
import {VisionPage} from '../pages/vision/vision';

import {AngularFireModule} from '@angular/fire';
import {AngularFirestoreModule} from '@angular/fire/firestore';
import {AngularFireStorageModule} from '@angular/fire/storage';

import {Camera} from '@ionic-native/camera';

const firebaseConfig = {
  apiKey: 'xxxxxx',
  authDomain: 'xxxxxx.firebaseapp.com',
  databaseURL: 'https://xxxxxx.firebaseio.com',
  projectId: 'xxxxxx',
  storageBucket: 'xxxx.appspot.com',
  messagingSenderId: 'xxxxxx',
};

@NgModule({
  declarations: [
    MyApp,
    HomePage,
    VisionPage,
  ],
  imports: [
    BrowserModule,
    IonicModule.forRoot(MyApp),
    AngularFireModule.initializeApp(firebaseConfig),
    AngularFirestoreModule,
    AngularFireStorageModule,
  ],
  bootstrap: [IonicApp],
  entryComponents: [
    MyApp,
    HomePage,
    VisionPage,
  ],
  providers: [
    StatusBar,
    SplashScreen,
    {provide: ErrorHandler, useClass: IonicErrorHandler},
    Camera,
  ],
})
export class AppModule {
}

Step 2: Let's make it work

There is so much going on in the VisionPage component, let's break it down and see it step by step.

1) User clicks "Capture Image" button which triggerscaptureAndUpload()to bring up the device camera.

2) Camera returns the image as a Base64 string. I have reduced the quality of the image in order to reduce processing time. For me, even with 50% of the image quality, Google Vision API is doing well.

3) We generate an ID that is used for both the image filename and the Firestore document ID.

4) We then listen to this location in Firestore.

5) An upload task is created to transfer the file to storage.

6) We wait for the cloud function (refer my last post) to update Firestore.

7) Once the data is received from Firestore we use helper methods extractEmail() and extractContact() to extract email and contact information from the received string.

8) And it's done!!

import {Component} from '@angular/core';
import {IonicPage, Loading, LoadingController} from 'ionic-angular';

import {Observable} from 'rxjs/Observable';
import {filter, tap} from 'rxjs/operators';

import {AngularFireStorage, AngularFireUploadTask} from 'angularfire2/storage';
import {AngularFirestore} from 'angularfire2/firestore';

import {Camera, CameraOptions} from '@ionic-native/camera';

@IonicPage()
@Component({
  selector: 'page-vision',
  templateUrl: 'vision.html',
})
export class VisionPage {

  // Upload task
  task: AngularFireUploadTask;

  // Firestore data
  result$: Observable<any>;

  loading: Loading;
  image: string;

  constructor(
    private storage: AngularFireStorage,
    private afs: AngularFirestore,
    private camera: Camera,
    private loadingCtrl: LoadingController) {

    this.loading = this.loadingCtrl.create({
      content: 'Running AI vision analysis...',
    });
  }

  startUpload(file: string) {

    // Show loader
    this.loading.present();

    // const timestamp = new Date().getTime().toString();
    const docId = this.afs.createId();

    const path = `${docId}.jpg`;

    // Make a reference to the future location of the firestore document
    const photoRef = this.afs.collection('photos').doc(docId);

    // Firestore observable
    this.result$ = photoRef.valueChanges().pipe(
      filter(data => !!data),
      tap(_ => this.loading.dismiss()),
    );

    // The main task
    this.image = 'data:image/jpg;base64,' + file;
    this.task = this.storage.ref(path).putString(this.image, 'data_url');
  }

  // Gets the pic from the native camera then starts the upload
  async captureAndUpload() {
    const options: CameraOptions = {
      quality: 50,
      destinationType: this.camera.DestinationType.DATA_URL,
      encodingType: this.camera.EncodingType.JPEG,
      mediaType: this.camera.MediaType.PICTURE,
      sourceType: this.camera.PictureSourceType.PHOTOLIBRARY,
    };

    const base64 = await this.camera.getPicture(options);

    this.startUpload(base64);
  }

  extractEmail(str: string) {
    const emailRegex = /(([^<>()\[\]\\.,;:\s@"]+(\.[^<>()\[\]\\.,;:\s@"]+)*)|(".+"))@((\[[0-9]{1,3}\.[0-9]{1,3}\.[0-9]{1,3}\.[0-9]{1,3}])|(([a-zA-Z\-0-9]+\.)+[a-zA-Z]{2,}))/;
    const {matches, cleanedText} = this.removeByRegex(str, emailRegex);
    return matches;
  };

  extractContact(str: string) {
    const contactRegex = /(?:(\+?\d{1,3}) )?(?:([\(]?\d+[\)]?)[ -])?(\d{1,5}[\- ]?\d{1,5})/;
    const {matches, cleanedText} = this.removeByRegex(str, contactRegex);
    return matches;
  }

  removeByRegex(str, regex) {
    const matches = [];
    const cleanedText = str.split('\n').filter(line => {
      const hits = line.match(regex);
      if (hits != null) {
        matches.push(hits[0]);
        return false;
      }
      return true;
    }).join('\n');
    return {matches, cleanedText};
  };

}

Step 3: Display your result

Let's create a basic UI using ionic components

<!--
  Generated template for the VisionPage page.

  See http://ionicframework.com/docs/components/#navigation for more info on
  Ionic pages and navigation.
-->
<ion-header>

  <ion-navbar>
    <ion-title>Meishi</ion-title>
  </ion-navbar>

</ion-header>


<ion-content padding>
  <ion-row>

    <ion-col col-12 text-center>

      <button ion-button icon-start (tap)="captureAndUpload()">
        <ion-icon name="camera"></ion-icon>
        Capture Image
      </button>

    </ion-col>

    <ion-col col-12>
      <img width="100%" height="auto" [src]="image">
    </ion-col>

    <ion-col *ngIf="result$ | async as result">

      <h4>
        <span class="title">名前: </span><br>
        {{result.requiredEntities.PERSON}}
      </h4>
      <h4>
        <span class="title">Email:</span><br>
        <span *ngFor="let email of extractEmail(result.text)">{{email}}<br></span>
      </h4>
      <h4>
        <span class="title">電話番号:</span><br>
        <span *ngFor="let phone of extractContact(result.text)">{{phone}}<br></span>
      </h4>
      <h4>
        <span class="title">組織:</span><br>
        {{result.requiredEntities.ORGANIZATION}}
      </h4>
      <h4>
        <span class="title">住所:</span><br>
        {{result.requiredEntities.LOCATION}}
      </h4>

      <h4><span class="title">認識されたテキスト</span></h4>

      <h5>
        {{result.text}}
      </h5>


    </ion-col>
  </ion-row>

</ion-content>

Step 4: Generate an app into platform of your choice

Finally, let's generate an application into iOS or Android
Run the following command to create a build of the app for iOS

 ionic cordova build ios

In a similar way to generate android app, run the following command

 ionic cordova build an Android

Open the app on an emulator or on an actual device and test it yourself

Congrats!! we just create a Business Card Reader app powered with Machine Learning :)

That's it for this post see you soon with one of such next time; until then,
Happy Learning :)

機械学習・学ぶアルゴリズムの3つの大事な部分

チナパです! ちょっと久しぶりに機械学習に本格できるようになりましたので、大好きなところから始め、論文を読んでました。 そこで、皆さんにもシェアしたいのがありましてーーーここ!

A few useful things to know about machine learning - Pedro Domingos https://homes.cs.washington.edu/~pedrod/papers/cacm12.pdf

とシェアしたら、「英語のハードルが!!」と言われそうでしたので、こうして日本語でまとめます!(優しいでしょう?)

分類系の機械学習(分類器? 難しい日本語だな。クラシファイアの種類です!)に集中していますが、とりあえず始めましょう。

学ぶ者(アルゴリズムね)の3つの部分

f:id:c-pattamada:20190125203246p:plain
こんな感じです!

機械学習がとても大きな箱です。その中にあるそれぞれの手段、技術などはどう分担すればよいのでしょうかとずっと思っていたところで、この論文で綺麗にまとめられました。

「機械学習 = Deep Learning = Neural Network」と思う方(昔の私)もいるかもしれないが、実際はこんな感じです。

表現

分類器(クラシファイア君)を作るためには、コンピュータが理解できる言語で作られた何らかの形を選択する必要があります。これはクラシファイア君の「表現」と言われます。 ニューラルネットワークはもしかして一番有名な表現かもしれません、つまり

f:id:c-pattamada:20190125202443p:plain
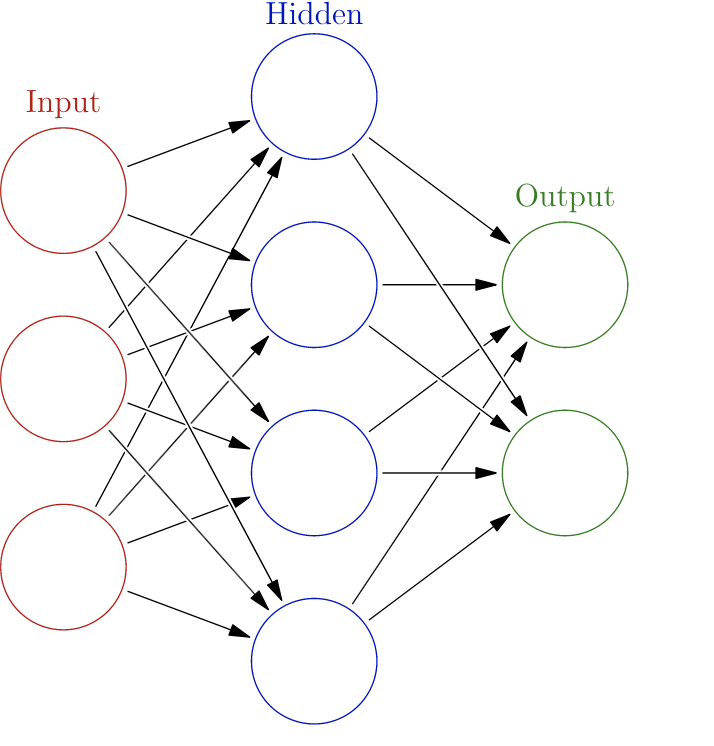
ニューラルネットワーク

こんな感じの表現です。生のデータげ左に入って、複数のレイヤーでフィーチャーの関係を見つけ出して答えにたどり着くような表現です。

ニューラルネットワークの他に、以下のような決定木もよく使われます。

f:id:c-pattamada:20190125202544p:plain
決定木

こちらでは、順番の判断によって結論にたどり着きます。

それぞれは得意分野と弱点を持っています。なんでかというと、表現によって見つけられる答えが限られてきます。なぜなら、それぞれの表現には「仮説スペース」があるからです。仮説スペースに入っていない答えを見つけるのが不可能です(鍵を車に忘れている場合、いくら家に探しても見つからないでしょう?そういうものです。)

他の表現の例は

ナイブベイズ K-最近傍法 (kNN) SVM などなど。

機械学習は一般的にこの「表現」についてまとめられるのが多いですが、他の部分もとても大事です。

もう、表現について長く語りました。次に移しましょう。

評価

形がどうであれ、機械学習にはデータを利用して仮説を改善し、正しい答えに近づこうとするのが共通です。「改善」ができる前に、まずは現状況の良さ・悪さを把握しなければなりません。

場合によって「正答率」のが一番直感かもしれませんが ここ で書いたように、正答率は全てではありません。悪人判定しようとしながら、「99.99%の人は悪人でないから、とりあえず「悪人ではない」と言えば99.99%正解じゃん!」という無意味なプログラムを釣りたくはないでしょう。

Fバリュー(Precision and recall)についても書いたことがありますが、それ以外にも評価のやり方がたくさんあります。

developers.goalist.co.jp

クラス分類ではなく、連続分布からのバリューを予想とするときは二乗誤差(Squared error)なども使えます。

改善・最適化

現在の表現で見つけている答えの質を評価できた上で、そのモデルを変更して改善することが可能となります。

Deep Learning でよく使われてるのが最急降下法(Gradient Descent)です。偏微分を使って、現在の状況に比べて、少しだけの変更でどう「評価」改善できるかを計算するアルゴリズムです。

例えをしますと、坂登りで、めを閉じる場合にも下り道が分かるではないか(危険ですよ、実際に転び落ちたことがあります)、最急降下法それに似ています。この例えでは周りに比べてた「最善」が坂の底です。

上記のGradient Descent(最急降下法)の他にも改善のやり方があります。

Greedy SearchとBeam Searchでもあります。(辞書にも出てこないですけど!欲深い検索ではありません!)最急降下法と違って、こちらの二つはいくつかの有限な選択肢をよりよく組み合わせようとする方法です。

巻き

書き始めた時には、5つぐらいのトピックはこの記事で書こうと思ってましたが、もう結構長いですね。

上記には、機械学習、いわゆる「学ぶプログラム」を作成するための大事なみつの部分について説明しました。

詳細書きすぎたかも知れませんが、この続きには機械学習のモデルなどを作る時に重要なポイントを他にも説明します。

次回は「一般化できるか?」と長くなければ「データだけでは足りぬ!」というワクワクできそうなトピックを書きたいです!

以上チナパでした!

Business Card Reader : Part 1 : Backend (Cloud Functions)

Hello World! My name is Vivek Amilkanthawar
In this and the subsequent blog posts, we'll be creating a Business Card Reader as an iOS App with the help of Ionic, Firebase, Google Cloud Vision API and Google Natural Language API

The final app will look something like this

f:id:vivek081166:20190121142143g:plain

Okay so let's get started...
The entire process can be broken down into the following steps.
1) User uploads an image to Firebase storage via @angular/fire in Ionic.
2) The upload triggers a storage cloud function.
3) The cloud function sends the image to the Cloud Vision API
4) Result of image analysis is then sent to Cloud Language API and the final results are saved in Firestore.
5) The final result is then updated in realtime in the Ionic UI.

Let's finish up the important stuff first... the backend. In this blog post we'll be writing Cloud Function to do this job... (step #2, step #3 and step #4 of the above process)

The job of the cloud function that we are about to write can be visualized as below: f:id:vivek081166:20190121151148p:plain

Whenever the new image is uploaded to the storage, our cloud function will get triggered and the function will call Google Machine Learning APIs to perform Vision analysis on the uploaded image. Once the image analysis is over the recognized text is then passed to Language API to separate meaningful information.

Step 1: Set up Firebase CLI

Install Firebase CLI via npm using following command

npm install firebase-functions@latest firebase-admin@latest --save
npm install -g firebase-tools

Step 2: Initialize Firebase SDK for Cloud Functions

To initialize your project:
1) Run firebase login to log in via the browser and authenticate the firebase tool.
2) Go to your Firebase project directory.
3) Run firebase init functions
4) When asked for the language of choice/support chose Typescript

After these commands complete successfully, your project structure should look like this:

myproject
 +- .firebaserc    # Hidden file that helps you quickly switch between
 |                 # projects with `firebase use`
 |
 +- firebase.json  # Describes properties for your project
 |
 +- functions/     # Directory containing all your functions code
      |
      +- tslint.json  # Optional file containing rules for TypeScript linting.
      |
      +- tsconfig.json  # file containing configuration for TypeScript.
      |
      +- package.json  # npm package file describing your Cloud Functions code
      |
      +- node_modules/ # directory where your dependencies (declared in package.json) are installed
      |
      +- src/
          |
          +- index.ts      # main source file for your Cloud Functions code

Step 3: Write your code

All you have to edit is the index.ts file

1) Get all your imports correct, we need
@google-cloud/vision for vision analysis
@google-cloud/language for language analysis
firebase-admin for authentication and initialization of app
firebase-functions to get hold on the trigger when a new image file is updated to storage bucket on firebase

2)onFinalize method is triggered when the uploading of the image is completed. The URL of a newly uploaded Image File can be captured here.

3) Pass the image URL to visionClient to perform text detection on the image

4) visionResults is a plain text string containing all the words/characters recognized during image analysis

5) Pass this result to language API to get meaning full information from the text.
Language API categorizes the text into different entities. Out of various entities let's filter only the requiredEntities which are person name, location/address, and organization.
(Phone number and Email can be extracted by using regex, we will do this at the front end)

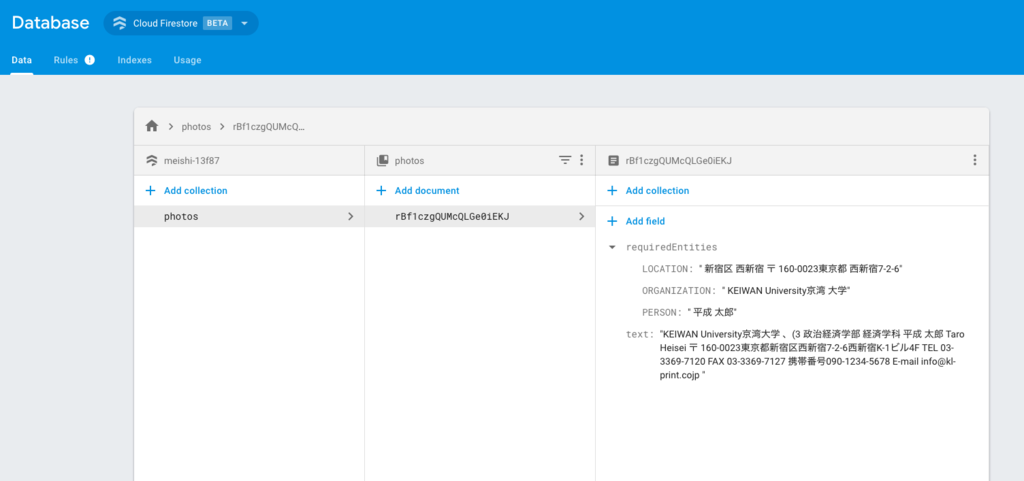
6) Finally, save the result into Firestore Database

import * as functions from 'firebase-functions';
import * as admin from 'firebase-admin';
import * as vision from '@google-cloud/vision'; // Cloud Vision API
import * as language from '@google-cloud/language'; // Cloud Natural Language API
import * as _ from 'lodash';

admin.initializeApp(functions.config().firebase);

const visionClient = new vision.ImageAnnotatorClient();
const languageClient = new language.LanguageServiceClient();

let text; // recognized text
const requiredEntities = {ORGANIZATION: '', PERSON: '', LOCATION: ''};

// Dedicated bucket for cloud function invocation
const bucketName = 'meishi-13f87.appspot.com';

export const imageTagger = functions.storage.
    object().
    onFinalize(async (object, context) => {

      /** Get the file URL of newly uploaded Image File **/
      // File data
      const filePath = object.name;

      // Location of saved file in bucket
      const imageUri = `gs://${bucketName}/${filePath}`;

      /** Perform vision and language analysis **/
      try {

        // Await the cloud vision response
        const visionResults = await visionClient.textDetection(imageUri);

        const annotation = visionResults[0].textAnnotations[0];
        text = annotation ? annotation.description : '';

        // pass the recognized text to Natural Language API
        const languageResults = await languageClient.analyzeEntities({
          document: {
            content: text,
            type: 'PLAIN_TEXT',
          },
        });

        // Go through detected entities
        const {entities} = languageResults[0];

        _.each(entities, entity => {
          const {type} = entity;
          if (_.has(requiredEntities, type)) {
            requiredEntities[type] += ` ${entity.name}`;
          }
        });

      } catch (err) {
        // Throw an error
        console.log(err);
      }

      /** Save the result into Firestore **/
          // Firestore docID === file name
      const docId = filePath.split('.jpg')[0];
      const docRef = admin.firestore().collection('photos').doc(docId);
      return docRef.set({text, requiredEntities});

    });

Step 4: Deploy your function

Run this command to deploy your functions:

firebase deploy --only functions

Storage f:id:vivek081166:20190121173201p:plain Database f:id:vivek081166:20190121172904p:plain

That's it.. with this our backend is pretty much ready.
Let's work on front-end side in the upcoming blog post till then
Happy Learning :)

Reference:

cloud.google.com

cloud.google.com

Using pre-trained Machine Learning (ML) Models in the browser with TensorFlow.js & Angular

Greetings for the day! My name is Vivek.

In this blog post, let's see how to use your pre-trained Machine Learning (ML) model directly in the browser using Tensorflow.js and Angular

f:id:vivek081166:20181213173144p:plain

The following section of this blog is interactive, so you can try to draw a number between 0 ~ 9 and see the predicted output in the browser⤵︎
Go ahead and try it yourself, draw a number inside this blue box↓

Amazzing isn't it? Let's learn how to do this step by step

#Step 1) Convert your Keras model to load into TensorFlow.js

TensorFlow for Javascript has a Python CLI tool that converts an h5 model saved in Keras to a set of files that can be used on the web.
To install it, run the following command

pip install tensorflowjs

At this point, you will need to have a Keras model saved on your local system.

Suppose you have your Keras Model save at the following location
input_path/file_name.h5
and suppose you want to generate output at the following location
path_to_output_folder/
In that case your command to convert model will look something like this

tensorflowjs_converter --input_format keras \
                       input_path/file_name.h5 \
                       path_to_output_folder

In my case, the model is located in keras/cnn.h5 and I would like to keep my converted model at src/assets directory so I shall run the following command

tensorflowjs_converter --input_format keras \
                       keras/cnn.h5 \
                       src/assets

Input and Output directories should look similar to this
Input
f:id:vivek081166:20181228151743p:plain Output
f:id:vivek081166:20181228151624p:plain

#Step 2) Load the converted model into your Angular component

To load the model, you need TensorFlow.js library in your Angular application
Install it using Node Package Manager

npm install @tensorflow/tfjs --save

Here is how to load the model into your component

import {Component, OnInit} from '@angular/core';
import * as tf from '@tensorflow/tfjs';

@Component({
  selector: 'app-root',
  templateUrl: './app.component.html',
  styleUrls: ['./app.component.scss'],
})
export class AppComponent implements OnInit {

  model: tf.Model;

  ngOnInit() {
    this.loadModel();
  }

  // Load pre-trained KERAS model
  async loadModel() {
    this.model = await tf.loadModel('./assets/model.json');
  }

}

#Step 3) Make predictions using live drawn image data in the browser

Now that our model is loaded, it is expecting 4-dimensional image data in a shape of
[any, 28, 28, 1]
[batchsize, width pixels, height pixels, color channels]

Just trying to avoid memory leaks and to clean up the intermediate memory allocated to the tensors we run our predictions inside of tf.tidy() ( TensorFlow.js)

TensorFlow.js gives us a fromPixels (TensorFlow.js) helper to convert an ImageData HTML object into a Tensor.
So the complete code looks like this ↓

import {Component, OnInit} from '@angular/core';

import * as tf from '@tensorflow/tfjs';

@Component({
  selector: 'app-root',
  templateUrl: './app.component.html',
  styleUrls: ['./app.component.scss'],
})
export class AppComponent implements OnInit {

  model: tf.Model;
  predictions: any;
  
  ngOnInit() {
    this.loadModel();
  }

  // Load pretrained KERAS model
  async loadModel() {
    this.model = await tf.loadModel('./assets/model.json');
  }

  // Do predictions
  async predict(imageData: ImageData) {

    const pred = await tf.tidy(() => {

      // Convert the canvas pixels to 
      let img = tf.fromPixels(imageData, 1);
      // @ts-ignore
      img = img.reshape([1, 28, 28, 1]);
      img = tf.cast(img, 'float32');

      // Make and format the predications
      const output = this.model.predict(img) as any;

      // Save predictions on the component
      this.predictions = Array.from(output.dataSync());
    });

  }

}

And component HTML looks like this

<div class="container">

  <!--Input Section-->
  <div class="column justify-content-center">
    <div class="col-sm">
      <h5>Draw a number here </h5>
      <div class="wrapper">
        <canvas drawable (newImage)="predict($event)"></canvas>
        <br>
      </div>
      <button class="btn btn-sm btn-warning" (click)="canvas.clear()">Erase</button>
    </div>

    <!--Prediction Section-->
    <div class="col-sm predict">
      <h5>TensorFlow Prediction</h5>
      <chart [data]="predictions"></chart>
    </div>
  </div>
</div>

<router-outlet></router-outlet>

There we go... we just used Machine Learning in the browser.

Learn more about using TensorFlow.js here youtu.be

To learn more about the methods used in the tutorial refer to this js.tensorflow.org

That's all for now, see you next time with some more TensorFlow stuff... till then
Happy Learning !!

AWS Amplify Console でAngularアプリをデプロイす!

こんにちは、開発部の飯尾です。
AWS re:Invent 2018 で発表ほやほやの新サービス、AWS Amplify Console を早速試してみました。

aws.amazon.com

何ができる?

  • 静的サイトのホスティング、HTTPS化
  • SPAフレームワーク(React, Angular, Vue)のビルド
  • 静的サイト生成フレームワーク(Jekyll, Hugo, Gatsby)のビルド
  • リポジトリの更新をトリガーにビルド&デプロイ
  • OAuthによる閲覧制限
  • Route53でカスタムドメイン指定

ホスティングとCIに必要なものが一式そろっている(ドン!)(すしざんまいのポーズ)

やってみる!

手順

  1. リポジトリを用意
  2. ビルド設定の作成
  3. デプロイ実行

詳しく

1. リポジトリを用意

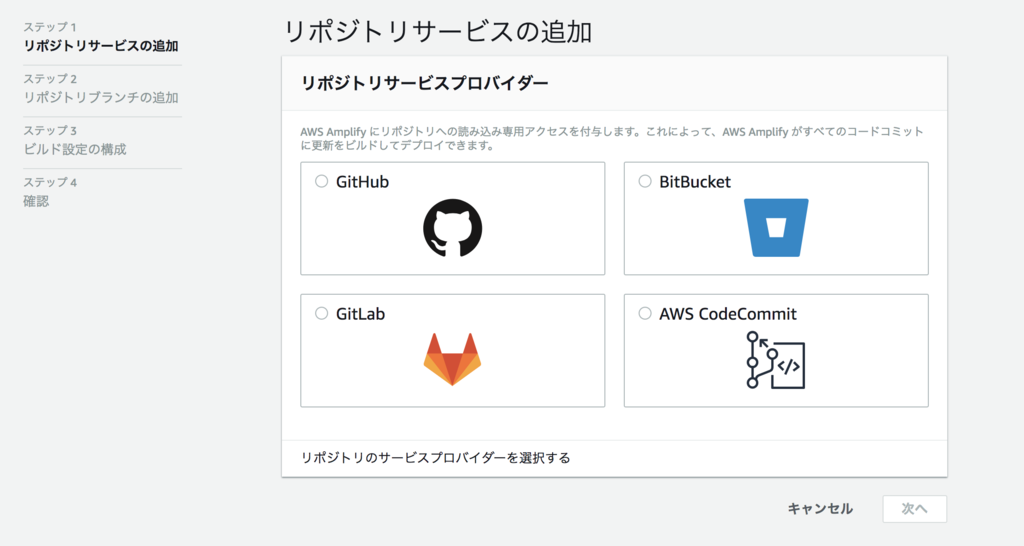
いつも使っているAngularアプリでためしてゆきます。

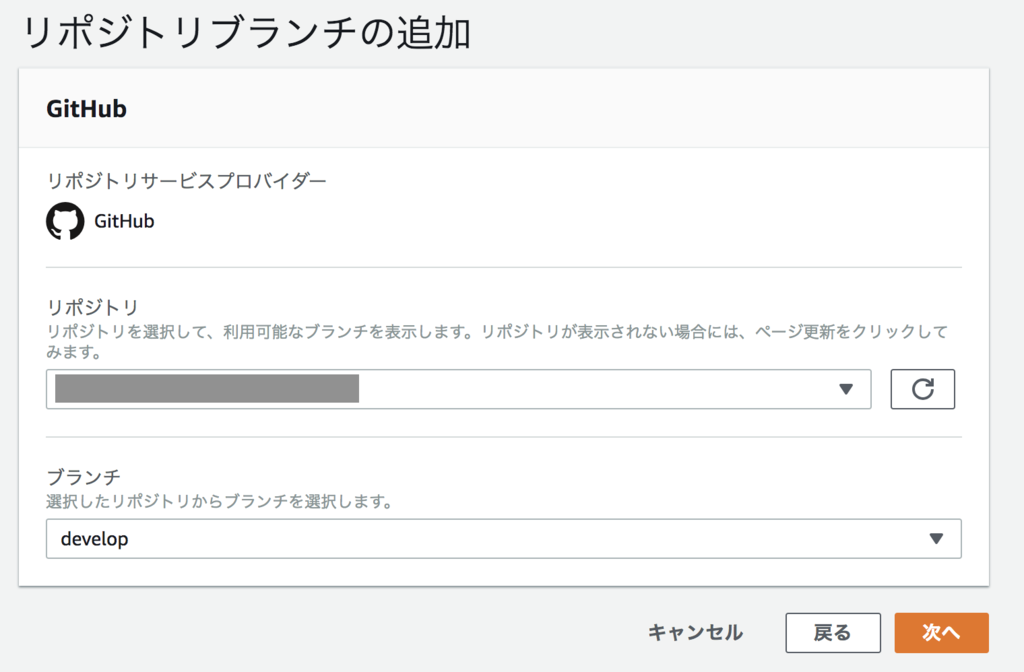
f:id:y-iio:20181218135738p:plain

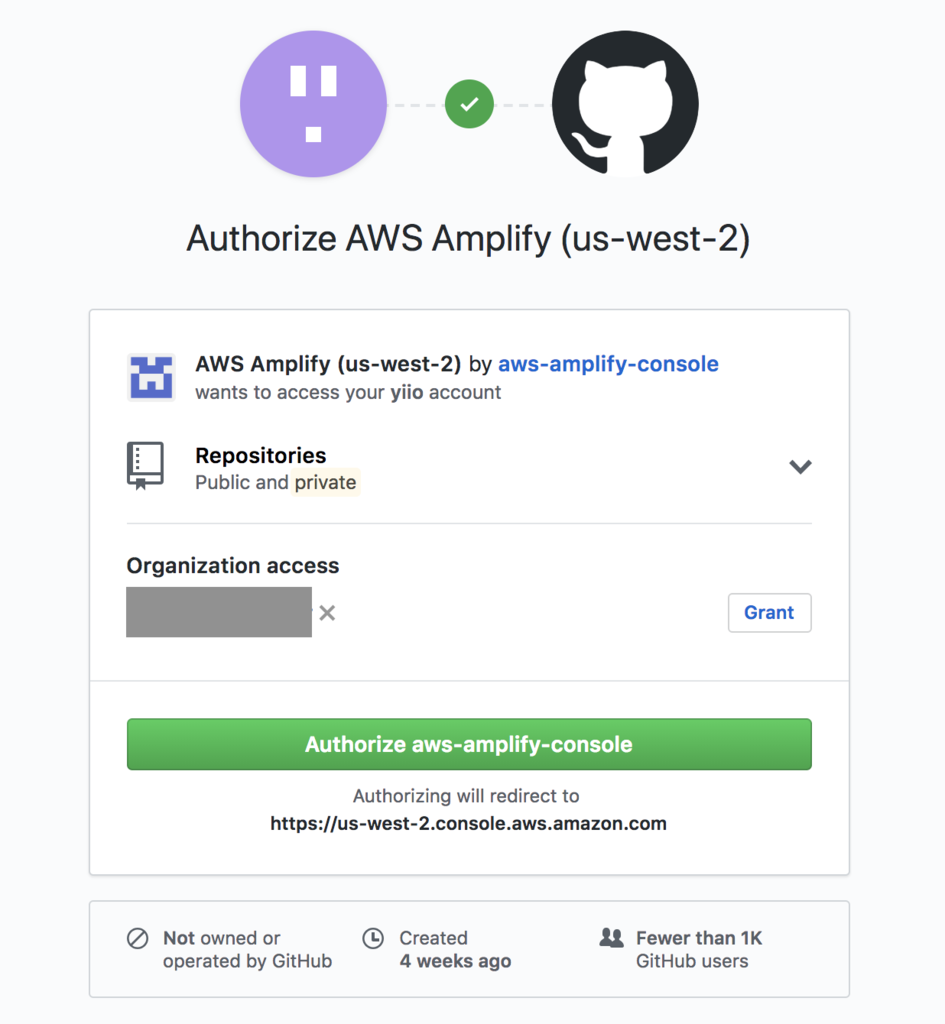
Organization Access 以下のリポジトリを利用するときはgrant申請する必要があります

f:id:y-iio:20181218135700p:plain

リポジトリを選択、既存のブランチから更新をフックするブランチを選択

f:id:y-iio:20181218135828p:plain

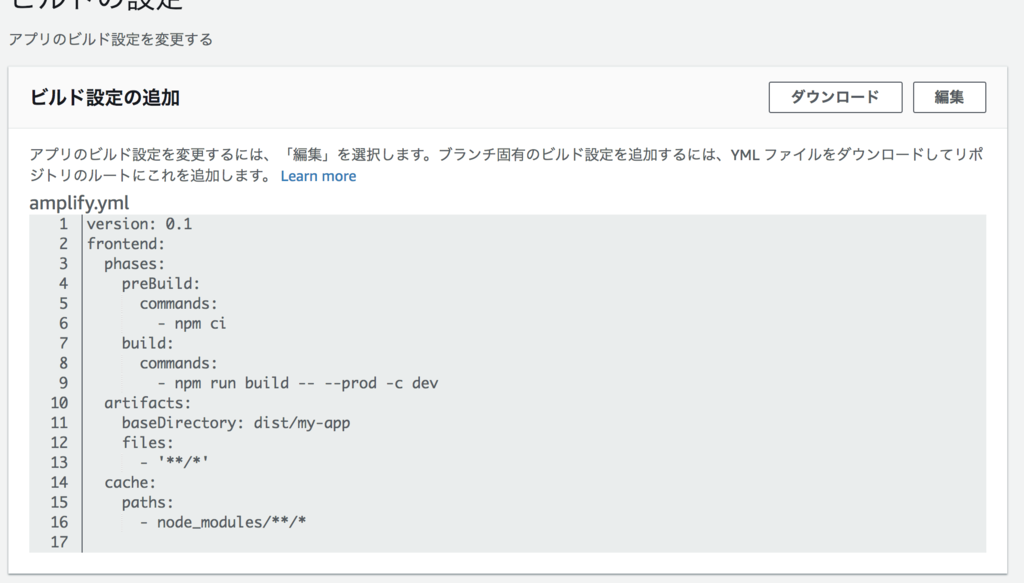
2. ビルド設定の作成

Angularフレームワークを自動検出してくれるのでほぼ何も書き足すことはないですが、、
ビルドコマンドのオプションだけいつもの条件になるようにちょい足し

f:id:y-iio:20181218135855p:plain

3. デプロイ実行

保存して実行すると、、

f:id:y-iio:20181218135922p:plain

できてる〜
amplifyapp.com ドメイン上にビルド成果物がホストされました。
URLをクリックすればもう使える!なにも用意しないでアプリをデプロイできちゃいました

感想

今まではS3のバケット用意して静的ホスティングしてCloudFrontかまして
CIツール接続してトリガー設定してビルド設定整えてIAM渡して…
とやっていたフロントエンドの環境構築、不要になってしまうな

はやく東京リージョン対応してほしいものですね!

ラズパイで無駄なもの作るよシリーズ② Lチカ編

こんにちは、開発部のイイオです。
ラズパイで初めての電子工作シリーズその2です。
今回は……はじめてのLチカ!!!

Lチカとは
Lチカとは、LEDチカチカの略である。
電子工作界のHello worldらしいです。

使うもの

  • 330Ωの抵抗
  • 赤色LED(1.85V)
  • ブレッドボード
  • ブレッドボード用ジャンパーワイヤ(オス-メスx2)(オス-オスx2)

まずは

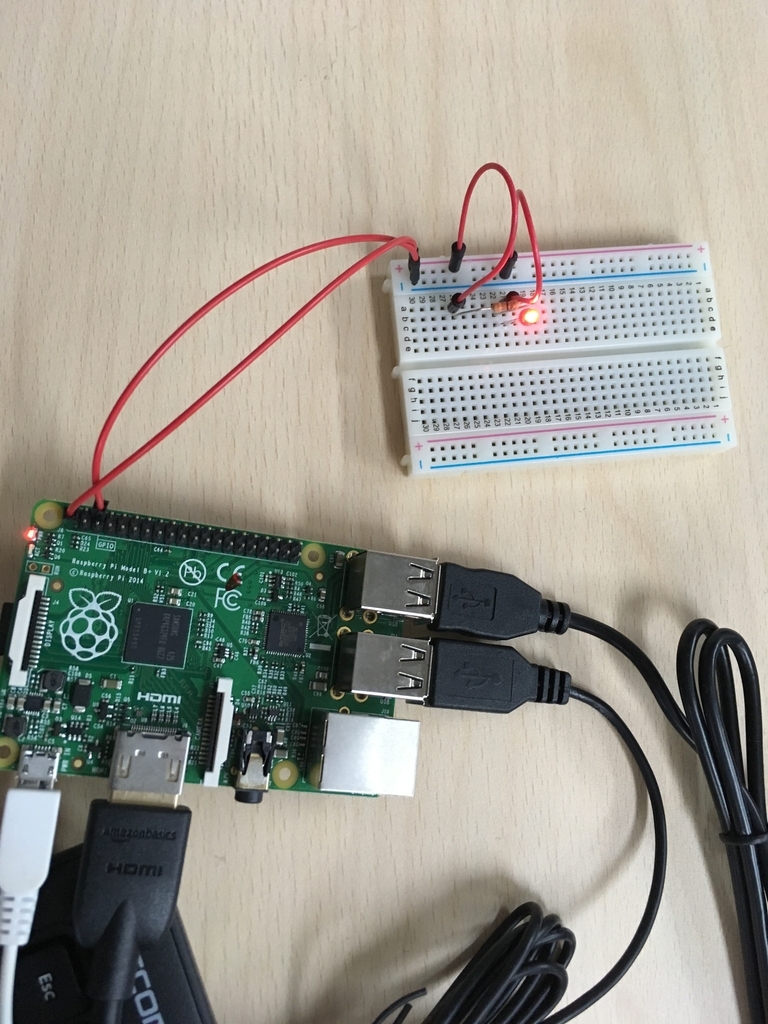
ラズパイのGPIO1番ポートから3.3Vを出力して、赤色LEDを点灯させる

ブレッドボードにパーツをデュクシ!して繋げる

f:id:y-iio:20181211165117j:plain Lピカ!

続いて

ラズパイのGPIO25番ポートからの電圧の出力をon-off制御して、赤色LEDを点滅させる

GPIO25番ポートはラズパイのコンピュータ内部を通るので、プログラミングによって出力を制御できるんじゃ
HIGH: 3.3V
LOW: 0V

ラズパイのパイはPythonのパイ!パイ乙!Pythonで処理を書きます。

f:id:y-iio:20181211165240j:plain

python用のコンソールとエディタみたいなのがデフォルトのアプリで入っています。
補完もすこしは用意されている…けど
タイポも教えてくれないし生まれた時からIDEに甘やかされてきた俺的にはオホホ

GPIO.output(ポート番号, 出力値) で、GPIO.HIGHとGPIO.LOWを0.5秒ずつ切り替えます。

import RPi.GPIO as GPIO
from time import sleep

GPIO.setmode(GPIO.BCM)
GPIO.setup(25, GPIO.OUT)

for i in range(10):
    GPIO.output(25, GPIO.HIGH)
    sleep(0.5)
    GPIO.output(25, GPIO.LOW)
    sleep(0.5)

GPIO.cleanup()

保存して実行〜

f:id:y-iio:20181211170619g:plain

Lチカ!

感想

休みの日しか手を付けられんのでものすご〜いゆっくり進行ですが地道に進めますよう
次回はラズパイへの入力をやってみます。

Study tips for JLPT N2

What??? You may ask, this is a developer blog and what JLPT N2 has to do with it.

Well, you'll agree with the fact that communication is of utmost importance at any workplace... don't you?
However good you are at your work skills, it will be of no use if you fail to communicate properly with your colleagues.

So that being said, I would like to share my study techniques to learn Japanese and prepare for JLPT N2 examination in a fun way.

My name is Vivek and this blog post is intended for those who are preparing for JLPT N2
(Japanese Language Proficiency Test N2) (日本語能力試験 N2)

Let's get started...

I believe following are the major types of communication

f:id:vivek081166:20181129130903p:plain

f:id:vivek081166:20181129161634g:plain Verbal f:id:vivek081166:20181129161631g:plain Non-Verbal f:id:vivek081166:20181129161620g:plainWritten


If you observe carefully more than 70% of the time you need some language to communicate. Whether you write something or speak of/about something.
So, to sum up here... I would say
Language is essentially a means of communication among the members of a society. You need to master the language (in which you are communicating) to communicate effectively.
In my case, being in Japan IT industry for more than 4 years now, I had to learn Japanese for my work. And you must agree with this.. it is one of the most difficult languages in the world.

During my Japanese Language study I tried various method and tools and here I would like to share those with all of you.

Learn using Memrise

www.memrise.com

I absolutely love this tool!

The most difficult part of learning any language is to memorize alphabets and vocabulary. Memrise as per its name, it helps to memorize things which you have to learn by heart.

It uses mems to help you form vivid, sensory memories. It tests you continuously, always making sure to give your brain just the right workout. It also reminds you of what you've learned at scientifically optimized times so your memories are always growing stronger and never forgotten.

I'm currently undertaking the following courses on Memrise

1) JLPT N2 from Memrise Beta

www.memrise.com

By the time you visit this course, it would have been released in full version but currently, it is βeta version but still the best.

2) JLPT N2 Target 2000 Vocabulary

www.memrise.com

The previous course has detailed words but this short course will help you study and revise only specific words for the examination. Keep this course in mind and soon I'll share with you a trick to effectively use this course.

3) N2 Kanji

www.memrise.com

It will be hard to stick to this course but if you are patient, eventually you'll master kanji for everyday use in Japan.

Learn using YouTube

You read it right! Learn using YouTube.
Imagine how great it is to learn from good teachers by watching video anywhere anytime without even have to go to School.
I'm a visual learner and hence YouTube has always been a great place for me to learn anything.

I would like to recommend the following courses to prepare for JLPT N2 exam from Nihongo no Mori.
And again, believe me, you need not go to any School if you take these video courses

www.youtube.com

Believe me you need not to waste money on any school if you watch these videos and learn from them.

1) VS JLPT N2 Grammar

www.youtube.com

She is my favorite teacher till now... her explanation will help you remember and learn Japanese Grammar intended for JLPT N2 exam.

2) Kanji N2

www.youtube.com

Here 覚え方 of (Logic to remember) Kanji taught by 先生 (teacher) will help you remember Kanji fast and never forget... it's fun :)

3) JLPT N2 ことば

www.youtube.com

Remember I told you keep JLPT N2 Target 2000 Vocabulary - Memrise course in mind. You can use this video lecture combined with Memrise course and your efforts to memorize vocabulary will be drastically reduced.

4) 耳から覚える語彙 N2

www.youtube.com

In two hours you will be going on a ride of 1200 words with examples... isn't it awesome!!


Well, folks that all I have for now...
See you soon with some technical blog till then
Happy Learning... :)