Goalist Developers Blog

Business Card Reader : Part 1 : Backend (Cloud Functions)

Hello World! My name is Vivek Amilkanthawar
In this and the subsequent blog posts, we'll be creating a Business Card Reader as an iOS App with the help of Ionic, Firebase, Google Cloud Vision API and Google Natural Language API

The final app will look something like this
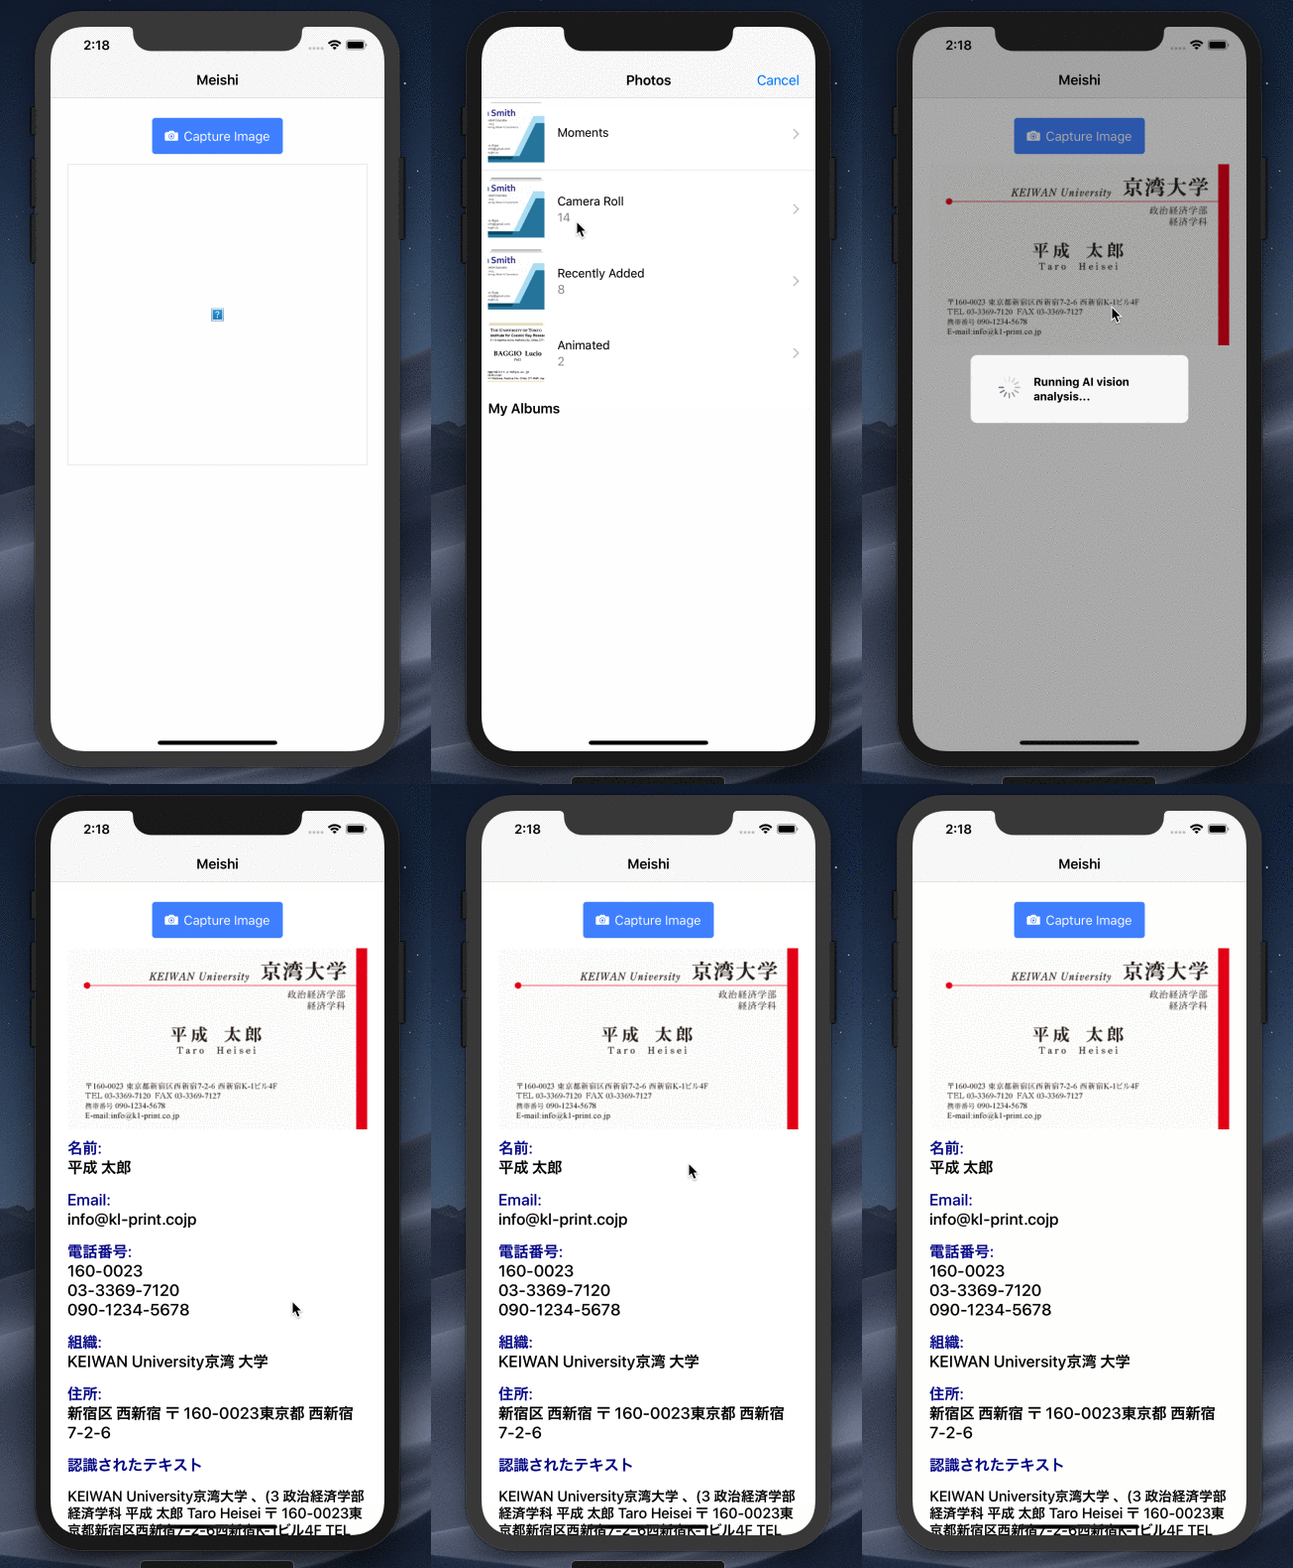
f:id:vivek081166:20190121142143g:plain

Okay so let's get started...
The entire process can be broken down into the following steps.
1) User uploads an image to Firebase storage via @angular/fire in Ionic.
2) The upload triggers a storage cloud function.
3) The cloud function sends the image to the Cloud Vision API
4) Result of image analysis is then sent to Cloud Language API and the final results are saved in Firestore.
5) The final result is then updated in realtime in the Ionic UI.

Let's finish up the important stuff first... the backend. In this blog post we'll be writing Cloud Function to do this job... (step #2, step #3 and step #4 of the above process)

The job of the cloud function that we are about to write can be visualized as below: f:id:vivek081166:20190121151148p:plain

Whenever the new image is uploaded to the storage, our cloud function will get triggered and the function will call Google Machine Learning APIs to perform Vision analysis on the uploaded image. Once the image analysis is over the recognized text is then passed to Language API to separate meaningful information.

Step 1: Set up Firebase CLI

Install Firebase CLI via npm using following command

npm install firebase-functions@latest firebase-admin@latest --save
npm install -g firebase-tools

Step 2: Initialize Firebase SDK for Cloud Functions

To initialize your project:
1) Run firebase login to log in via the browser and authenticate the firebase tool.
2) Go to your Firebase project directory.
3) Run firebase init functions
4) When asked for the language of choice/support chose Typescript

After these commands complete successfully, your project structure should look like this:

myproject
 +- .firebaserc    # Hidden file that helps you quickly switch between
 |                 # projects with `firebase use`
 |
 +- firebase.json  # Describes properties for your project
 |
 +- functions/     # Directory containing all your functions code
      |
      +- tslint.json  # Optional file containing rules for TypeScript linting.
      |
      +- tsconfig.json  # file containing configuration for TypeScript.
      |
      +- package.json  # npm package file describing your Cloud Functions code
      |
      +- node_modules/ # directory where your dependencies (declared in package.json) are installed
      |
      +- src/
          |
          +- index.ts      # main source file for your Cloud Functions code

Step 3: Write your code

All you have to edit is the index.ts file

1) Get all your imports correct, we need
@google-cloud/vision for vision analysis
@google-cloud/language for language analysis
firebase-admin for authentication and initialization of app
firebase-functions to get hold on the trigger when a new image file is updated to storage bucket on firebase

2)onFinalize method is triggered when the uploading of the image is completed. The URL of a newly uploaded Image File can be captured here.

3) Pass the image URL to visionClient to perform text detection on the image

4) visionResults is a plain text string containing all the words/characters recognized during image analysis

5) Pass this result to language API to get meaning full information from the text.
Language API categorizes the text into different entities. Out of various entities let's filter only the requiredEntities which are person name, location/address, and organization.
(Phone number and Email can be extracted by using regex, we will do this at the front end)

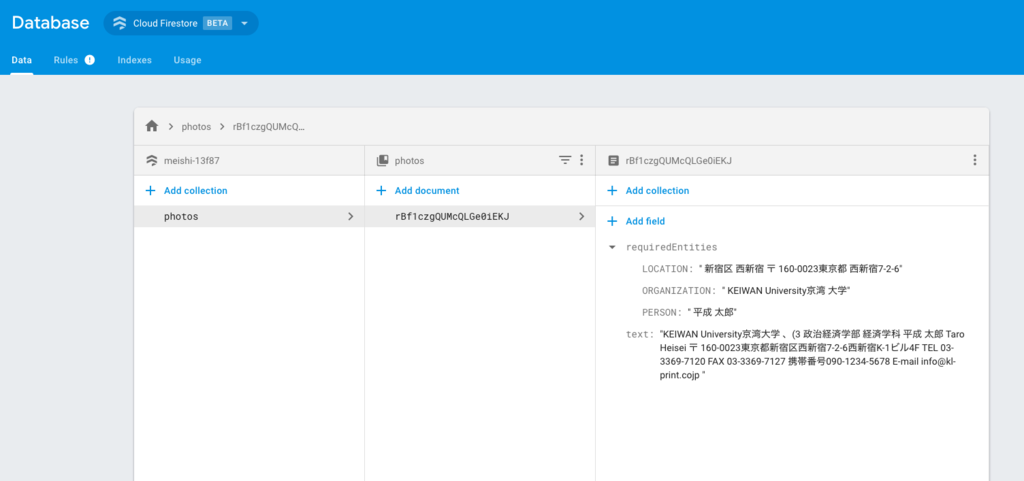
6) Finally, save the result into Firestore Database

import * as functions from 'firebase-functions';
import * as admin from 'firebase-admin';
import * as vision from '@google-cloud/vision'; // Cloud Vision API
import * as language from '@google-cloud/language'; // Cloud Natural Language API
import * as _ from 'lodash';

admin.initializeApp(functions.config().firebase);

const visionClient = new vision.ImageAnnotatorClient();
const languageClient = new language.LanguageServiceClient();

let text; // recognized text
const requiredEntities = {ORGANIZATION: '', PERSON: '', LOCATION: ''};

// Dedicated bucket for cloud function invocation
const bucketName = 'meishi-13f87.appspot.com';

export const imageTagger = functions.storage.
    object().
    onFinalize(async (object, context) => {

      /** Get the file URL of newly uploaded Image File **/
      // File data
      const filePath = object.name;

      // Location of saved file in bucket
      const imageUri = `gs://${bucketName}/${filePath}`;

      /** Perform vision and language analysis **/
      try {

        // Await the cloud vision response
        const visionResults = await visionClient.textDetection(imageUri);

        const annotation = visionResults[0].textAnnotations[0];
        text = annotation ? annotation.description : '';

        // pass the recognized text to Natural Language API
        const languageResults = await languageClient.analyzeEntities({
          document: {
            content: text,
            type: 'PLAIN_TEXT',
          },
        });

        // Go through detected entities
        const {entities} = languageResults[0];

        _.each(entities, entity => {
          const {type} = entity;
          if (_.has(requiredEntities, type)) {
            requiredEntities[type] += ` ${entity.name}`;
          }
        });

      } catch (err) {
        // Throw an error
        console.log(err);
      }

      /** Save the result into Firestore **/
          // Firestore docID === file name
      const docId = filePath.split('.jpg')[0];
      const docRef = admin.firestore().collection('photos').doc(docId);
      return docRef.set({text, requiredEntities});

    });

Step 4: Deploy your function

Run this command to deploy your functions:

firebase deploy --only functions

Storage f:id:vivek081166:20190121173201p:plain Database f:id:vivek081166:20190121172904p:plain

That's it.. with this our backend is pretty much ready.
Let's work on front-end side in the upcoming blog post till then
Happy Learning :)

Reference:

cloud.google.com

cloud.google.com

Using pre-trained Machine Learning (ML) Models in the browser with TensorFlow.js & Angular

Greetings for the day! My name is Vivek.

In this blog post, let's see how to use your pre-trained Machine Learning (ML) model directly in the browser using Tensorflow.js and Angular

f:id:vivek081166:20181213173144p:plain

The following section of this blog is interactive, so you can try to draw a number between 0 ~ 9 and see the predicted output in the browser⤵︎
Go ahead and try it yourself, draw a number inside this blue box↓

Amazzing isn't it? Let's learn how to do this step by step

#Step 1) Convert your Keras model to load into TensorFlow.js

TensorFlow for Javascript has a Python CLI tool that converts an h5 model saved in Keras to a set of files that can be used on the web.
To install it, run the following command

pip install tensorflowjs

At this point, you will need to have a Keras model saved on your local system.

Suppose you have your Keras Model save at the following location
input_path/file_name.h5
and suppose you want to generate output at the following location
path_to_output_folder/
In that case your command to convert model will look something like this

tensorflowjs_converter --input_format keras \
                       input_path/file_name.h5 \
                       path_to_output_folder

In my case, the model is located in keras/cnn.h5 and I would like to keep my converted model at src/assets directory so I shall run the following command

tensorflowjs_converter --input_format keras \
                       keras/cnn.h5 \
                       src/assets

Input and Output directories should look similar to this
Input
f:id:vivek081166:20181228151743p:plain Output
f:id:vivek081166:20181228151624p:plain

#Step 2) Load the converted model into your Angular component

To load the model, you need TensorFlow.js library in your Angular application
Install it using Node Package Manager

npm install @tensorflow/tfjs --save

Here is how to load the model into your component

import {Component, OnInit} from '@angular/core';
import * as tf from '@tensorflow/tfjs';

@Component({
  selector: 'app-root',
  templateUrl: './app.component.html',
  styleUrls: ['./app.component.scss'],
})
export class AppComponent implements OnInit {

  model: tf.Model;

  ngOnInit() {
    this.loadModel();
  }

  // Load pre-trained KERAS model
  async loadModel() {
    this.model = await tf.loadModel('./assets/model.json');
  }

}

#Step 3) Make predictions using live drawn image data in the browser

Now that our model is loaded, it is expecting 4-dimensional image data in a shape of
[any, 28, 28, 1]
[batchsize, width pixels, height pixels, color channels]

Just trying to avoid memory leaks and to clean up the intermediate memory allocated to the tensors we run our predictions inside of tf.tidy() ( TensorFlow.js)

TensorFlow.js gives us a fromPixels (TensorFlow.js) helper to convert an ImageData HTML object into a Tensor.
So the complete code looks like this ↓

import {Component, OnInit} from '@angular/core';

import * as tf from '@tensorflow/tfjs';

@Component({
  selector: 'app-root',
  templateUrl: './app.component.html',
  styleUrls: ['./app.component.scss'],
})
export class AppComponent implements OnInit {

  model: tf.Model;
  predictions: any;
  
  ngOnInit() {
    this.loadModel();
  }

  // Load pretrained KERAS model
  async loadModel() {
    this.model = await tf.loadModel('./assets/model.json');
  }

  // Do predictions
  async predict(imageData: ImageData) {

    const pred = await tf.tidy(() => {

      // Convert the canvas pixels to 
      let img = tf.fromPixels(imageData, 1);
      // @ts-ignore
      img = img.reshape([1, 28, 28, 1]);
      img = tf.cast(img, 'float32');

      // Make and format the predications
      const output = this.model.predict(img) as any;

      // Save predictions on the component
      this.predictions = Array.from(output.dataSync());
    });

  }

}

And component HTML looks like this

<div class="container">

  <!--Input Section-->
  <div class="column justify-content-center">
    <div class="col-sm">
      <h5>Draw a number here </h5>
      <div class="wrapper">
        <canvas drawable (newImage)="predict($event)"></canvas>
        <br>
      </div>
      <button class="btn btn-sm btn-warning" (click)="canvas.clear()">Erase</button>
    </div>

    <!--Prediction Section-->
    <div class="col-sm predict">
      <h5>TensorFlow Prediction</h5>
      <chart [data]="predictions"></chart>
    </div>
  </div>
</div>

<router-outlet></router-outlet>

There we go... we just used Machine Learning in the browser.

Learn more about using TensorFlow.js here youtu.be

To learn more about the methods used in the tutorial refer to this js.tensorflow.org

That's all for now, see you next time with some more TensorFlow stuff... till then
Happy Learning !!

AWS Amplify Console でAngularアプリをデプロイす!

こんにちは、開発部の飯尾です。
AWS re:Invent 2018 で発表ほやほやの新サービス、AWS Amplify Console を早速試してみました。

aws.amazon.com

何ができる?

  • 静的サイトのホスティング、HTTPS化
  • SPAフレームワーク(React, Angular, Vue)のビルド
  • 静的サイト生成フレームワーク(Jekyll, Hugo, Gatsby)のビルド
  • リポジトリの更新をトリガーにビルド&デプロイ
  • OAuthによる閲覧制限
  • Route53でカスタムドメイン指定

ホスティングとCIに必要なものが一式そろっている(ドン!)(すしざんまいのポーズ)

やってみる!

手順

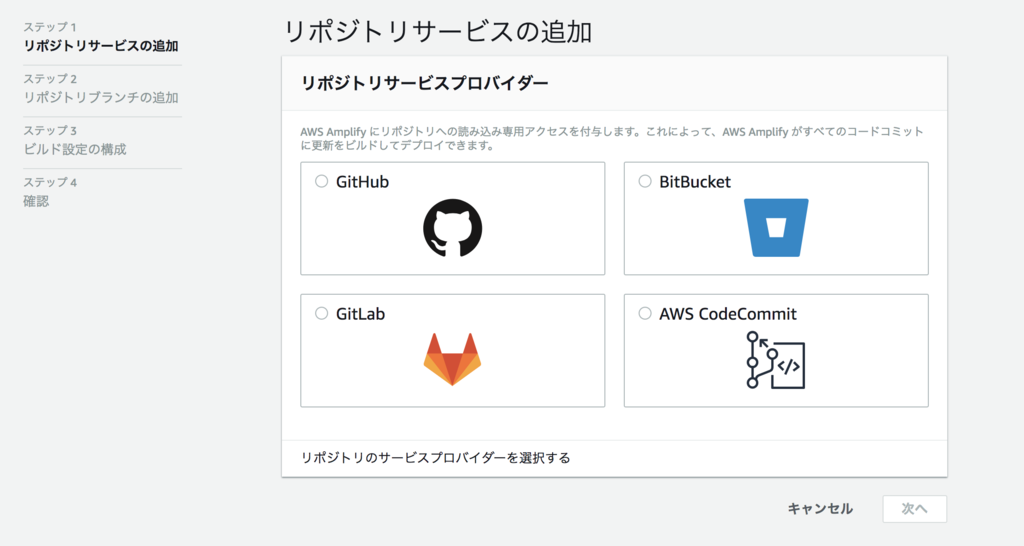
  1. リポジトリを用意
  2. ビルド設定の作成
  3. デプロイ実行

詳しく

1. リポジトリを用意

いつも使っているAngularアプリでためしてゆきます。

f:id:y-iio:20181218135738p:plain

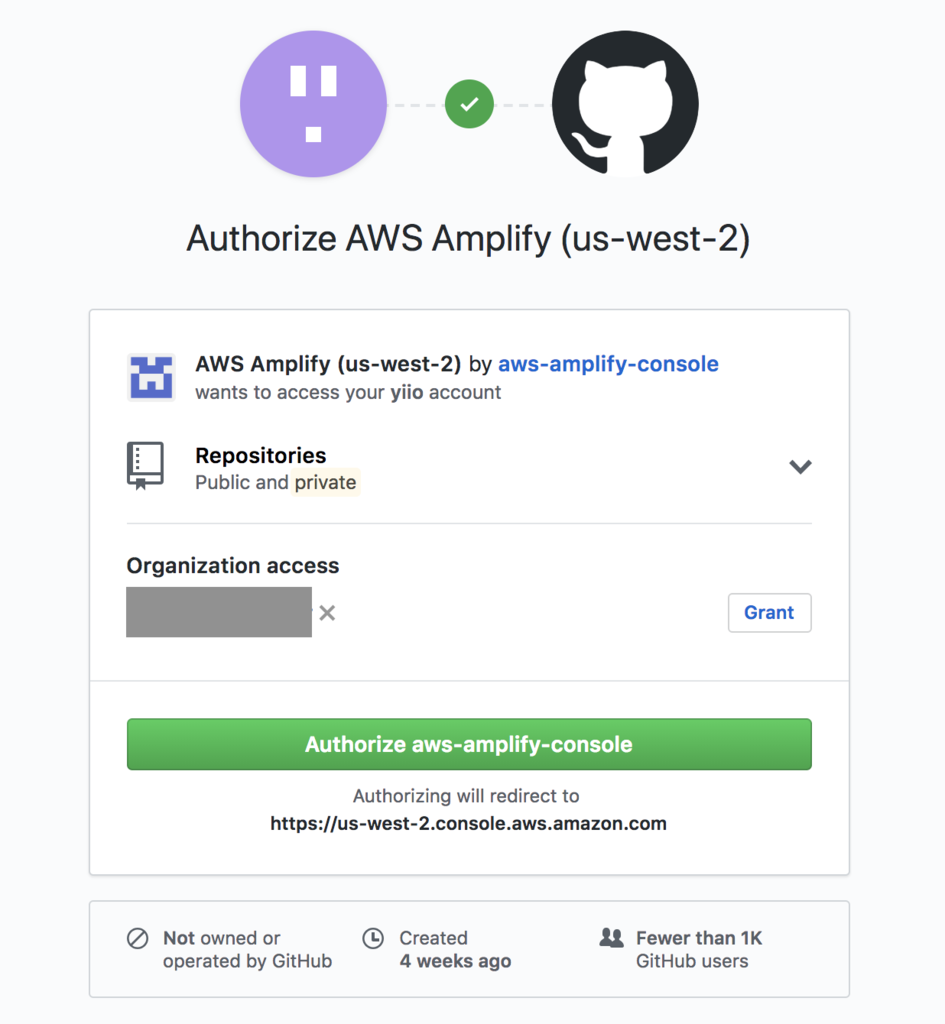
Organization Access 以下のリポジトリを利用するときはgrant申請する必要があります

f:id:y-iio:20181218135700p:plain

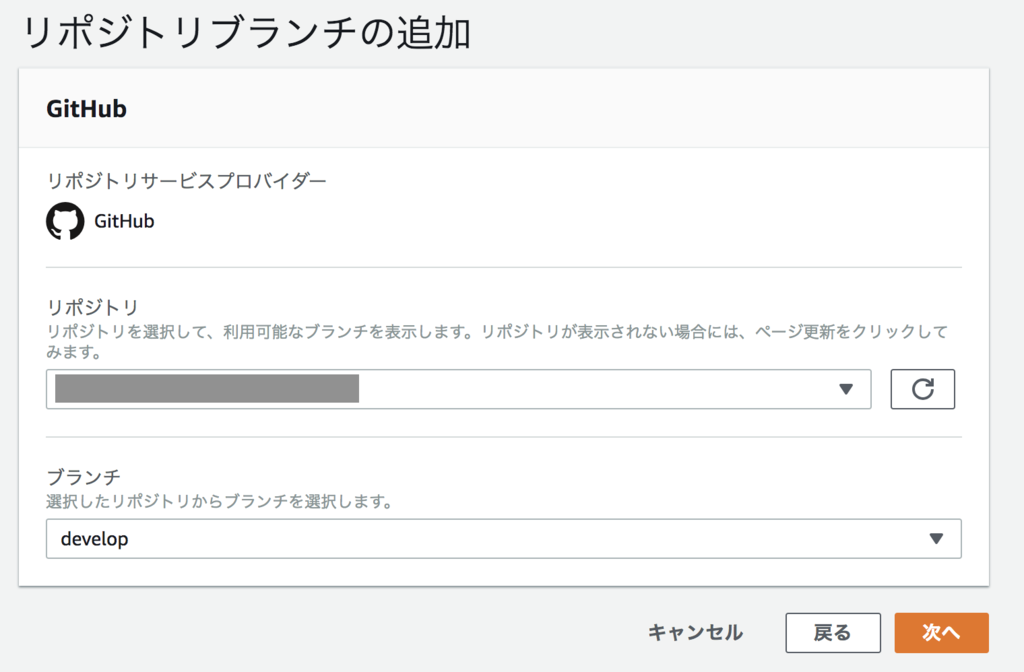
リポジトリを選択、既存のブランチから更新をフックするブランチを選択

f:id:y-iio:20181218135828p:plain

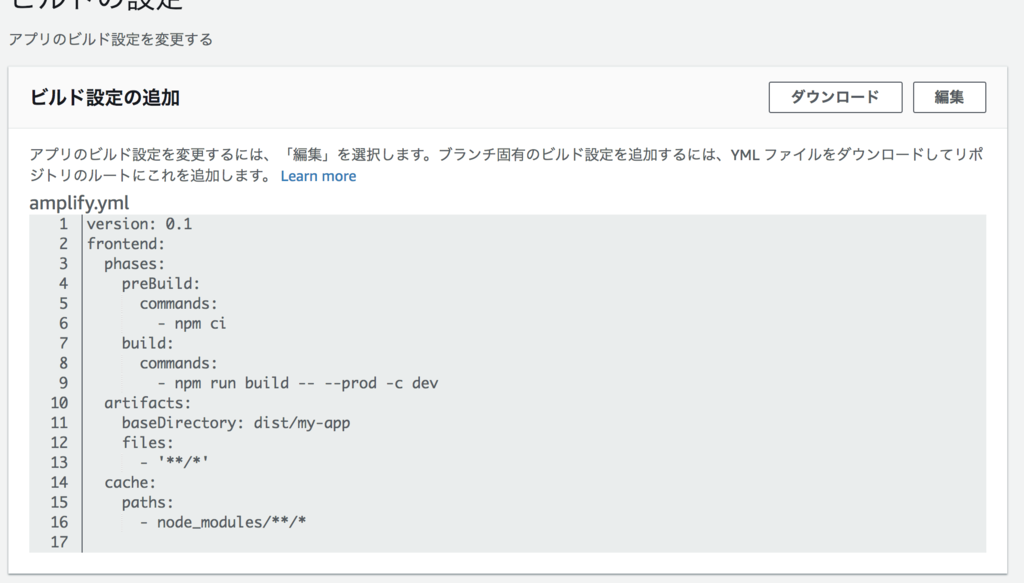
2. ビルド設定の作成

Angularフレームワークを自動検出してくれるのでほぼ何も書き足すことはないですが、、
ビルドコマンドのオプションだけいつもの条件になるようにちょい足し

f:id:y-iio:20181218135855p:plain

3. デプロイ実行

保存して実行すると、、

f:id:y-iio:20181218135922p:plain

できてる〜
amplifyapp.com ドメイン上にビルド成果物がホストされました。
URLをクリックすればもう使える!なにも用意しないでアプリをデプロイできちゃいました

感想

今まではS3のバケット用意して静的ホスティングしてCloudFrontかまして
CIツール接続してトリガー設定してビルド設定整えてIAM渡して…
とやっていたフロントエンドの環境構築、不要になってしまうな

はやく東京リージョン対応してほしいものですね!

ラズパイで無駄なもの作るよシリーズ② Lチカ編

こんにちは、開発部のイイオです。
ラズパイで初めての電子工作シリーズその2です。
今回は……はじめてのLチカ!!!

Lチカとは
Lチカとは、LEDチカチカの略である。
電子工作界のHello worldらしいです。

使うもの

  • 330Ωの抵抗
  • 赤色LED(1.85V)
  • ブレッドボード
  • ブレッドボード用ジャンパーワイヤ(オス-メスx2)(オス-オスx2)

まずは

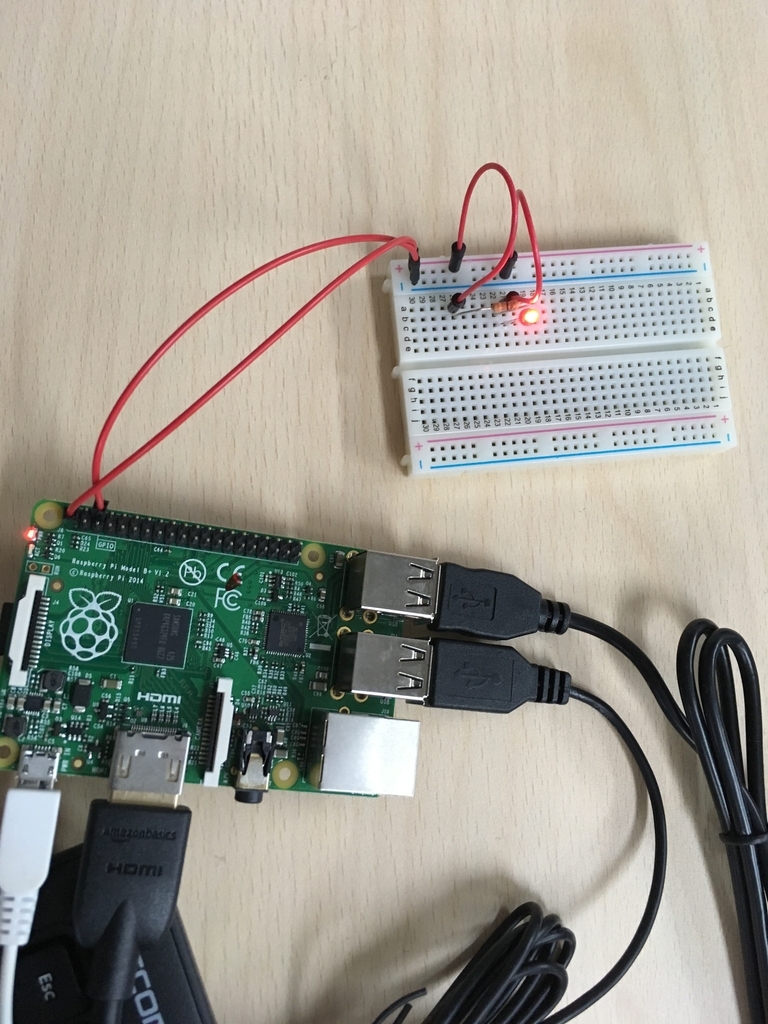
ラズパイのGPIO1番ポートから3.3Vを出力して、赤色LEDを点灯させる

ブレッドボードにパーツをデュクシ!して繋げる

f:id:y-iio:20181211165117j:plain Lピカ!

続いて

ラズパイのGPIO25番ポートからの電圧の出力をon-off制御して、赤色LEDを点滅させる

GPIO25番ポートはラズパイのコンピュータ内部を通るので、プログラミングによって出力を制御できるんじゃ
HIGH: 3.3V
LOW: 0V

ラズパイのパイはPythonのパイ!パイ乙!Pythonで処理を書きます。

f:id:y-iio:20181211165240j:plain

python用のコンソールとエディタみたいなのがデフォルトのアプリで入っています。
補完もすこしは用意されている…けど
タイポも教えてくれないし生まれた時からIDEに甘やかされてきた俺的にはオホホ

GPIO.output(ポート番号, 出力値) で、GPIO.HIGHとGPIO.LOWを0.5秒ずつ切り替えます。

import RPi.GPIO as GPIO
from time import sleep

GPIO.setmode(GPIO.BCM)
GPIO.setup(25, GPIO.OUT)

for i in range(10):
    GPIO.output(25, GPIO.HIGH)
    sleep(0.5)
    GPIO.output(25, GPIO.LOW)
    sleep(0.5)

GPIO.cleanup()

保存して実行〜

f:id:y-iio:20181211170619g:plain

Lチカ!

感想

休みの日しか手を付けられんのでものすご〜いゆっくり進行ですが地道に進めますよう
次回はラズパイへの入力をやってみます。

Study tips for JLPT N2

What??? You may ask, this is a developer blog and what JLPT N2 has to do with it.

Well, you'll agree with the fact that communication is of utmost importance at any workplace... don't you?
However good you are at your work skills, it will be of no use if you fail to communicate properly with your colleagues.

So that being said, I would like to share my study techniques to learn Japanese and prepare for JLPT N2 examination in a fun way.

My name is Vivek and this blog post is intended for those who are preparing for JLPT N2
(Japanese Language Proficiency Test N2) (日本語能力試験 N2)

Let's get started...

I believe following are the major types of communication

f:id:vivek081166:20181129130903p:plain

f:id:vivek081166:20181129161634g:plain Verbal f:id:vivek081166:20181129161631g:plain Non-Verbal f:id:vivek081166:20181129161620g:plainWritten


If you observe carefully more than 70% of the time you need some language to communicate. Whether you write something or speak of/about something.
So, to sum up here... I would say
Language is essentially a means of communication among the members of a society. You need to master the language (in which you are communicating) to communicate effectively.
In my case, being in Japan IT industry for more than 4 years now, I had to learn Japanese for my work. And you must agree with this.. it is one of the most difficult languages in the world.

During my Japanese Language study I tried various method and tools and here I would like to share those with all of you.

Learn using Memrise

www.memrise.com

I absolutely love this tool!

The most difficult part of learning any language is to memorize alphabets and vocabulary. Memrise as per its name, it helps to memorize things which you have to learn by heart.

It uses mems to help you form vivid, sensory memories. It tests you continuously, always making sure to give your brain just the right workout. It also reminds you of what you've learned at scientifically optimized times so your memories are always growing stronger and never forgotten.

I'm currently undertaking the following courses on Memrise

1) JLPT N2 from Memrise Beta

www.memrise.com

By the time you visit this course, it would have been released in full version but currently, it is βeta version but still the best.

2) JLPT N2 Target 2000 Vocabulary

www.memrise.com

The previous course has detailed words but this short course will help you study and revise only specific words for the examination. Keep this course in mind and soon I'll share with you a trick to effectively use this course.

3) N2 Kanji

www.memrise.com

It will be hard to stick to this course but if you are patient, eventually you'll master kanji for everyday use in Japan.

Learn using YouTube

You read it right! Learn using YouTube.
Imagine how great it is to learn from good teachers by watching video anywhere anytime without even have to go to School.
I'm a visual learner and hence YouTube has always been a great place for me to learn anything.

I would like to recommend the following courses to prepare for JLPT N2 exam from Nihongo no Mori.
And again, believe me, you need not go to any School if you take these video courses

www.youtube.com

Believe me you need not to waste money on any school if you watch these videos and learn from them.

1) VS JLPT N2 Grammar

www.youtube.com

She is my favorite teacher till now... her explanation will help you remember and learn Japanese Grammar intended for JLPT N2 exam.

2) Kanji N2

www.youtube.com

Here 覚え方 of (Logic to remember) Kanji taught by 先生 (teacher) will help you remember Kanji fast and never forget... it's fun :)

3) JLPT N2 ことば

www.youtube.com

Remember I told you keep JLPT N2 Target 2000 Vocabulary - Memrise course in mind. You can use this video lecture combined with Memrise course and your efforts to memorize vocabulary will be drastically reduced.

4) 耳から覚える語彙 N2

www.youtube.com

In two hours you will be going on a ride of 1200 words with examples... isn't it awesome!!


Well, folks that all I have for now...
See you soon with some technical blog till then
Happy Learning... :)

Play Frameworkでテストを書く

チナパです! 最近新しいことを学んだので、書いてみようかなと思いました。

なぜテストを書く?

f:id:c-pattamada:20181129134919p:plain
Why do we need tests...?

複雑なプログラムを作るほど、ディバッグ、テスティングも大変になるのが一般的に知られてます。今日作ったソフトを6ヶ月間後編集しようとしますと、なかなか何が何に影響されるのを覚えるのも大変だと思います。

この二つの問題を対応するのに、テスティングをある程度まで(頑張ったら、完全に?)自動化できます。今日はサーバー側の話にします。

ご存知かもしれませんが、ゴーリストではPlay Framworkをよく使ってますので、Playの環境でやってみました。便利なHelperクラスもいくつかありますので、割と簡単にできるかと思います。

なので、Play Frameworkの基本知識が持ってる方が理解するのに楽だと思いますが、少しだけその辺も説明しますので、ご安心ください。

手順

まずは、PlayのProject Directoryを見てみましょう。(私はIntellij IDEAを使ってますが、sbtターミナルが使える状態にできますと特に環境が影響しないと思います)

f:id:c-pattamada:20181129130951p:plain
Play project directory

こちら、testというdirectoryが見えますが、存在してない場合は作成してください。その中にcontrollersのパッケージを作成しましょう。(ちなみに、sbtのスタータープロジェクトを使用する場合に、ここまですでにできているかと思います。)

コード説明

public class HomeControllerTest extends WithApplication {

    @Override
    protected Application provideApplication() {
        return new GuiceApplicationBuilder().build();
    }
}

このようなクラスを作成しましょう。HomeControllerTestではなくても、クラス名はなんでもOKです。

provideApplication()はこのクラスにPlayのApplicationが使えるようになるためにあります。 なぜ必要なのか?

オッケー、このあたりで、一体何を使用としているのかを説明しましょう。

多動でwebサーバーのテストを行う時に、どうしますか?例えば、

http://localhost/my/test/route

がちゃんと動いているかを確認したい場合は、ブラウザーや、Postmanなどのツールを使って、リクエストを送って結果を確認しているかもしれません。

その行動を真似するコードを書きます。簡単に、行動がコードにしましょう。ね。

いかのメソッドを作成しましょう。

    @Test // 1
    public void testMyTestRoute() {
        Http.RequestBuilder request = new Http.RequestBuilder()
                .method(GET)
                .uri("/my/test/route"); // 2

        Result result = route(app, request); // 3
        assertEquals(OK, result.status()); // 4
    }

1) @Testがテストを実装する時に、何メソッドを確認すれば良いのかを知らせるannotationです。

2) HttpRequestBuilderを使って、appの/my/test/routeにGETリクエストを投げてます。(ちなみに、GETがヘルパーコンスタントです)

3) サーバーのレスポンスをもらいます。これはPlayのルーターを使って、どこかのコントローラのメソッドをテストしています。

4) Httpレスポンスがstatusコードを持つ、ここで、そのstatusが200なのかを確認しています。assertEqualsはJUnitのテスティングフレームワークのメソッドです。二つのパラメーターが同じではない場合に、テストが失敗します。

上記のメソッドでこのようなことをテストできます。宛先のuriがちゃんと壊れずにうまく行きますか?(バグが出てる場合に、result.status()はおそらく500<=なので、ここでテストが失敗します。)

複数な@Testメソッドをもちろん作成した方が良いです。 例として、

1)ユーザー登録成功のテスト(ちゃんと登録できる確認)

2)ユーザーが登録で誤ったリクエスト(例:すでに登録したユーザーが弾かれる確認)

3)ログイン

…などなど。つまり一つのuriが複数のメソッドでテストされてるのもおかしくありません。自分はだいたい成功のテストとエラーのテストを分ける趣味です。

実装

さて、テストが作成できましたら、どうやって実装しますか?

IDEAでは、画面の下にあるsbt shellが使えます。別な環境では、project ディレクトリをターミナルで開いて、 sbtを打てば同じ環境に入れます。

起動が終わりましたら、

test

を打ってエンター押せば@Testのメソッドが実装されます。

はい。簡単です。(大変な量のログが出た後で、というアウトプットが見れます)

f:id:c-pattamada:20181129131042p:plain
成功した時

うまくいってない場合は以下のようにエラーログが出て、何がどこに壊れてるのかの当てが掴みやすくなると思います。

f:id:c-pattamada:20181129131126p:plain
あらら

結論

今日作成しているプログラムが来年別な人にメンテされることもあるでしょう。自分がまだ対応している場合にも、なかなか覚えてないこともあるでしょう。

そこで、知らず知らずにバグを起こしたら、testの段階でわかりやすくなるし、すぐに原因の尻尾も掴むこともできますので、ぜひテストを利用してコードを書きましょう!

Azureの顔認識APIで感情分析!社内の幸福ランキングを作成する

こんにちは、開発部のイイオです。

機械学習、はやりですね。
ゴーリスト社内でもモデル作成に勤しむ青年の姿が見受けられます。
でもパンピ〜の我々は、機械学習でいったいどんなことできるのか、手っ取り早くその果実を味わいたいですよね。

というわけで
Microsoft Azure が提供している顔認識の分類器を使って、会社の人々の幸福度を測定してみました。

今回計測にかけたのは、採用のために人事がやってるブログのこちらの記事です

blog.goalist.co.jp

上記ブログの写真から人間の顔を検出し、以下の8つの感情に分類します。
anger, contempt, disgust, fear, happiness, neutral, sadness, surprise

手順

1. APIキーを取得

API利用のためのキーを取得します、無料のゲストでOK
1分あたり20回のリクエストが可能です。

azure.microsoft.com

2. プログラムを書く

こんなかんじで、、

Python界に生まれて3日目くらいの人間が書いているので、お作法的にnot goodかもしれません
間違ってる部分あったらこっそり教えてください〜

やってることは

  1. 人事ブログ記事をクロール
  2. スクレイプして画像のURLを入手
  3. Face API に投げる
  4. 顔認識された座標で画像を切り取ってローカル保存
  5. 感情分析の結果をCSV出力

プログラム全体はこちら

3. 実行する

画像フォルダに切り出されたみんなの顔が増えていくのは正直わろうた

結果

同率1位

喜び以外の感情が全く検出されない、
フルハピネスなお祭り野郎はこいつらだ!!!

f:id:y-iio:20181115165702j:plain HRogの顔、営業部を統括する男

anger contempt disgust fear happiness neutral sadness surprise
0.0 0.0 0.0 0.0 1.0 0.0 0.0 0.0


f:id:y-iio:20181115165103j:plain お調子者の美女っていうのも良いですね

anger contempt disgust fear happiness neutral sadness surprise
0.0 0.0 0.0 0.0 1.0 0.0 0.0 0.0


f:id:y-iio:20181115181623j:plain インドからの刺客

anger contempt disgust fear happiness neutral sadness surprise
0.0 0.0 0.0 0.0 1.0 0.0 0.0 0.0


f:id:y-iio:20181115165800j:plain 石油王ではない ※参照

anger contempt disgust fear happiness neutral sadness surprise
0.0 0.0 0.0 0.0 1.0 0.0 0.0 0.0


f:id:y-iio:20181115181642j:plain こう見えてムッッッッキムキの兄さん

anger contempt disgust fear happiness neutral sadness surprise
0.0 0.0 0.0 0.0 1.0 0.0 0.0 0.0


f:id:y-iio:20181115181709j:plain ちからつよそう

anger contempt disgust fear happiness neutral sadness surprise
0.0 0.0 0.0 0.0 1.0 0.0 0.0 0.0


f:id:y-iio:20181115181731j:plain 天パ

anger contempt disgust fear happiness neutral sadness surprise
0.0 0.0 0.0 0.0 1.0 0.0 0.0 0.0


f:id:y-iio:20181115181821j:plain ドラえもんかな?

anger contempt disgust fear happiness neutral sadness surprise
0.0 0.0 0.0 0.0 1.0 0.0 0.0 0.0


2位〜 ハピネス度92.8〜99.9%のみなさん

f:id:y-iio:20181115182643j:plain こんなに破顔しているのに0.1%の悲しみが検出される"闇"

anger contempt disgust fear happiness neutral sadness surprise
0.0 0.0 0.0 0.0 0.999 0.0 0.001 0.0


f:id:y-iio:20181115182932j:plain ちょっと笑顔が足りなかったですかね

anger contempt disgust fear happiness neutral sadness surprise
0.0 0.0 0.0 0.0 0.995 0.0 0.005 0.0


f:id:y-iio:20181115183101j:plain 見切れがたたったか

anger contempt disgust fear happiness neutral sadness surprise
0.0 0.0 0.0 0.0 0.973 0.011 0.021 0.0


f:id:y-iio:20181115183436j:plain 曇りなき(まなこ)です

anger contempt disgust fear happiness neutral sadness surprise
0.0 0.0 0.0 0.0 0.953 0.046 0.0 0.0


f:id:y-iio:20181115183706j:plain 知的な美女というのも良い

anger contempt disgust fear happiness neutral sadness surprise
0.001 0.0 0.0 0.0 0.928 0.071 0.0 0.0


喜び以外の感情と判定された中間層!

f:id:y-iio:20181115184120j:plain 心の中では全く笑っていないのかもしれません

anger contempt disgust fear happiness neutral sadness surprise
0.0 0.004 0.0 0.0 0.202 0.794 0.0 0.0


f:id:y-iio:20181115184238j:plain あまり感情が表に出ない文系エンジニア

anger contempt disgust fear happiness neutral sadness surprise
0.001 0.001 0.0 0.0 0.122 0.866 0.011 0.0


f:id:y-iio:20181115184724j:plain 真面目な話をしているので…

anger contempt disgust fear happiness neutral sadness surprise
0.0 0.0 0.0 0.0 0.049 0.938 0.012 0.0


f:id:y-iio:20181115184854j:plain 菩薩

anger contempt disgust fear happiness neutral sadness surprise
0.0 0.0 0.0 0.0 0.002 0.981 0.016 0.0


f:id:y-iio:20181115185112j:plain 下向きの顔だとハピネス度が下がるのかもしれません

anger contempt disgust fear happiness neutral sadness surprise
0.001 0.0 0.0 0.0 0.0 0.833 0.166 0.0


最下位の中からPick UP!

f:id:y-iio:20181115182105j:plain 99.9%の無と0.1%の悲しみをたたえたフェイス

anger contempt disgust fear happiness neutral sadness surprise
0.0 0.0 0.0 0.0 0.0 0.999 0.001 0.0


感想

Pythonで何かしら動く、ふざけた楽しいプログラムを作りたいという気持ちで気軽に始めましたが
スクレイプ、画像処理、外部API利用、ファイル出力と色々試せて有意義でした。有意義でした!
決して、決して仕事の時間中に遊んでいたわけではないのですよ!